What customization options are available?
FlippingBook Online offers a variety of settings to customize your publications. You can change their look and feel, adjust their interface and privacy settings, and more!
To start customizing your flipbook settings, go to the list of your flipbooks, hover over the flipbook you'd like to customize, and click the Customize option.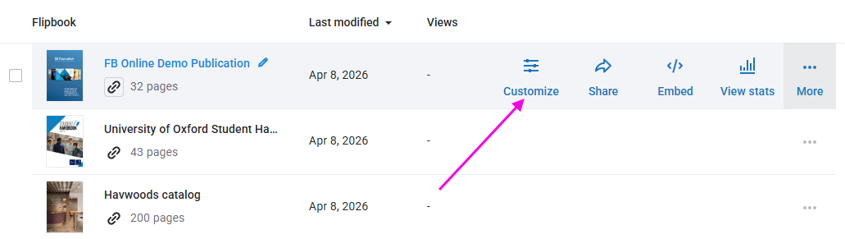
Important! ⚠️ Some features are available depending on your subscription plan. Check our pricing and plans page for more info.
- Branding & Style
- Controls
- Privacy
- Lead Capture Form
- Table of Contents
- Layout & Interaction
- Can I save my flipbook settings as default?
Branding & Style
Title & Description
The Title and Description that you give to your flipbooks are important! The title is used in several places:
- in the header in the top left corner of your flipbook;
- when someone finds your flipbook in a search engine;
- when sharing it on social media;
- in the browser tab.
Apart from the title, we also use the description when you share your flipbook on social networks.
Having the right Title and Description is important if you make your flipbook Public. Setting your flipbook as Public makes it available to search engines. They use this info when showing your publication in the search results.
Note! ⚠️ By default, we use the Title field from your PDF as the flipbook title. If the PDF has no title, we use the filename instead.
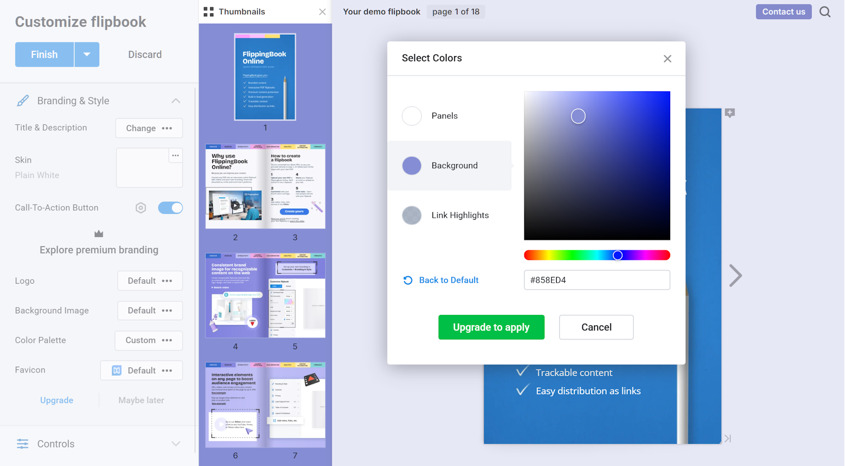
Skin
A Skin is a pre-designed template for your flipbook interface. It includes preset colors, menu bars, and a background image. We have created over 50 different skins for all occasions. Feel free to select the one that best fits your content.
For more information, read our article about adding a Skin to your flipbook.
Branding
Branding options give you visual customization options. You can enhance your publication by adding your brand image.
See the difference between a standard flipbook and a branded flipbook:
The Call-to-action button is available in all our plans.
The premium branding 👑 features set (Logo, Favicon, Background Image, and Color Palette) is available for you to explore inside the Customize option. However, to apply those features to your flipbook, you will need to have Optimal or higher plan:
You can find more details in our branding options article.
Controls
Here, you can choose which buttons and features your readers can use, like text selection, search, notes, or printing the PDF.
You can also pin a sidebar containing some of these options so that they remain easily accessible. This sidebar can contain your Table of Contents, Thumbnails of your pages, or the Search or Notes panel if you want to encourage your visitors to search or add notes.
Note! ⚠️ Keep in mind that the flipbook interface adjusts for mobile devices.
Our article 'How to control what readers can do in a flipbook?' gives a more in-depth view of this section.
Privacy
The Privacy section offers different privacy settings for your flipbooks. You can choose who gets to see your flipbooks using our different privacy settings, precisely defining who can view your flipbooks.
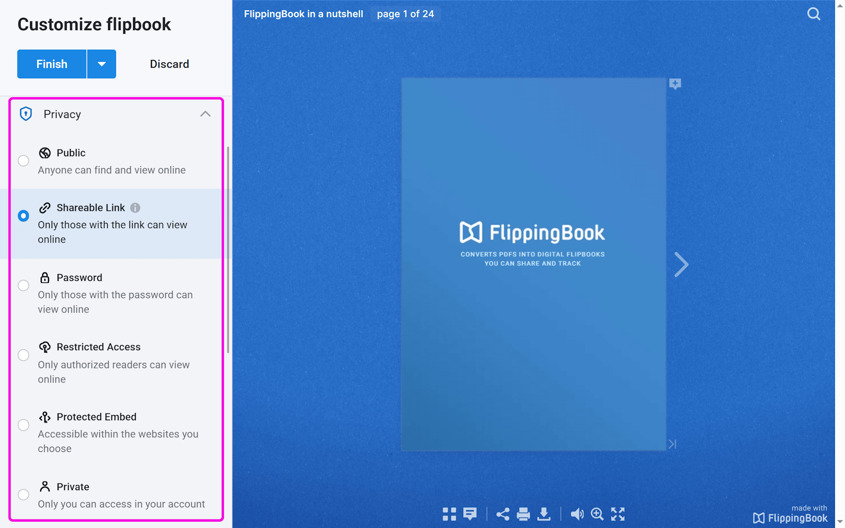
Password, Restricted Access (limits access to an authorized group), and Protected Embed (makes your flipbook work only on your site) are available with the Advanced plan or higher.
Our article Who can see my flipbooks? explains all the options in detail.
Lead Capture Form
The Lead Capture Form is available with the Optimal plan or higher and helps you collect contact information directly from your publication. It adds a screen to your publication that asks your readers to fill in their information before reaching a certain page. The collected information is available on the Stats page of the flipbook.
With the Advanced plan or higher, you can integrate your account with Zapier and export leads directly to your CRM, including Salesforce, HubSpot, Freshsales, and many others.
Check our specialized article about the Lead Capture Form for more detailed information.
Table of Contents
A Table of Contents (ToC) helps your readers quickly find what they need. They simply click a heading, and the flipbook opens to that page immediately.
If your PDF already has bookmarks, we’ll use them to create the ToC automatically. You can find more details in our How to add a Table of Contents to my flipbook? article.
Layout & Interaction
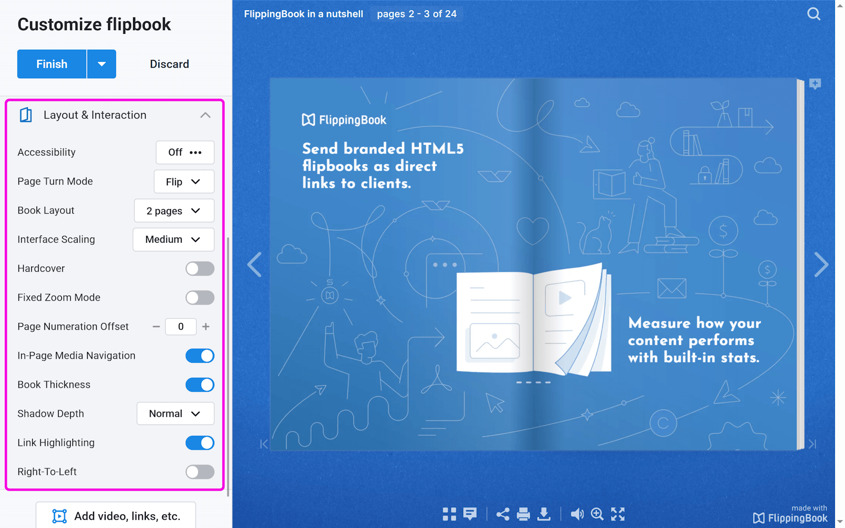
The Layout & Interaction section lets you fine-tune how your flipbook looks and behaves:
- Enable Accessibility to add a compliant PDF version for screen readers.
- Adjust the page turn style (Flip or Slide), choose between single-page or spread layouts
- Enhance visual realism with Hardcover, Book Thickness (both available with Starter or higher), and Shadow Depth effects.
- Interface Scaling allows you to adjust the interface elements, useful for readability or compact website embeds.
- In-Page Media Navigation allows users to browse all image galleries and pop-ups on the current pages, or limit them to one at a time. This feature is available with Optimal or higher.
- Add Right-To-Left page-flipping support for RTL languages.
Some other features offer deeper control over navigation and user experience:
- Page Numeration Offset lets you create an offset. Useful if the first pages have an intro, index, or similar.
- Fixed Zoom Mode keeps pages zoomed in as readers turn them, enhancing readability for visually dense content.
- Link Highlighting visually marks all clickable links on a page when it's opened, making navigation clearer.
Can I save my flipbook settings as default?
Yes! Your flipbook settings can be saved as default for future and existing uploads. This might come in handy when you need your publications to share a common style and preferences. You won’t have to select your settings manually, which can save you time and effort.
See our Tips for quickly creating flipbooks article for a more in-depth look.
Note! ⚠️ Managing your flipbook settings is a big topic and can be a lot to take in. If you feel a live demo would help to understand it better, feel free to book a meeting with one of our Customer Success Specialists.
Next Steps
Would you like to add videos, links, and images to your flipbook to make it even more interactive? Learn how to do it with the Content Editor.