Editor in-depth look and troubleshooting
You can add links, videos, and images using the Editor feature in FlippingBook Online. Even though it can be done in a few clicks there are still a few things to keep in mind to prevent potential errors. This article is designed to give you a better understanding of the Editor feature and also contains a few troubleshooting guides.
General
Video
- Why do I see an error message when I try to add my video to the flipbook?
- Why does my video open in a pop-up window even though I set it to play inline?
- How does the autoplay feature work?
Links
- How are links in my PDF handled?
- Can I make my links more noticeable?
- A part of my text was recognized as a link where it shouldn't have been. What can I do about it?
- Will my links remain intact if I replace the flipbook with a completely different PDF?
Images
Working with overlapping elements
It is possible to add elements to your flipbook that overlap each other. This way, you can -for example- create stacked images. Another common situation is where you add an inline image on a page but want it to be clickable. This means that you add a link of the same size as the image on top of that image.
When working with overlapping elements, you must pay attention to the ordering. If you add the link first and the image later, then the image will be in a higher 'layer' than the link. As a result, the link will be covered by the image and won't be clickable!
If this happens you can change the ordering of the elements. In the example above, we have added three images: a red, a yellow, and a blue box. The yellow image is currently selected. You can change the ordering using the controls in the panel below the page, from left to right:
- Send backward moves the selected element one layer down. This would hide the yellow box behind the red one.
- Bring forward moves the selected element one layer up. This would put the yellow box over the blue one.
- Send to back sends the selected element to the lowest layer. It will be covered by all other elements.
- Bring to front moves the selected element to the topmost layer. It will cover all other elements.
How to size and align your elements pixel-perfect?
What if you have several videos, links, images, GIFs, and forms that you want to have the same size and perfectly aligned? If all the elements are the same type and you are just starting to add them, you can...
- copy and paste the first element. You can use Ctrl+C and Ctrl+V on Windows or Command⌘+C and Command⌘+V on Mac;
- move your copy horizontally or vertically on the same line using the arrow keys. You can use the Shift + arrow keys to move your element 5 pixels at once;
- When your copy is in the right place, replace the source image(s) or URL (for videos or forms).
If you want to align different elements (e.g. a video and image) vertically and make them the same size, then you can do it as follows:
- Make sure that the first element is ideally sized and positioned.
- Write down the X value, width, and height of this element.
- Move the second (and subsequent) element to what is more or less the correct place
- Manually edit the X value, width, and height of the second element and make them the same as the noted values for the first element.
- If necessary, nudge the second element up or down with the arrow keys.
If you want to align them horizontally instead of vertically, use the same Y values instead of the X values!
Why do I see an error message when I try to add my video to the flipbook?
This depends on the video platform that you are using. Below we outline the most common reasons and solutions for YouTube, Vimeo, Wistia and MP4 videos on webservers.
Problems with adding YouTube videos
First, make sure that the link to your video opens correctly. If the video works fine when opening the direct link, then the most likely reason is that the video is a Private video.
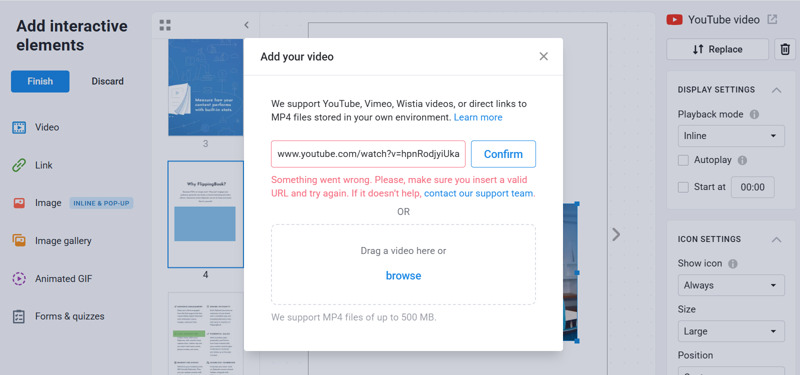
To add a video protected by a privacy settings, follow these steps:
- Go to your YouTube account
- Locate the video you would like to add to the flipbook.
- Temporarily change the visibility to Public (and Publish).
- Add the video to the flipbook.
- Return to your YouTube account and change the video visibility back to Private (and Save).
The video will now appear in your flipbook. It can be played by people whom you have invited and are signed in to their Google Account. So the video will be just as private as on YouTube itself. If you want the video to be available to all your readers, then consider using the Unlisted option. This way, the video won't appear in the Videos tab of your channel homepage and won't show up in YouTube's search results, but will play normally for anyone who opens the flipbook.
Problems with adding Vimeo videos
If you have a problem with adding Vimeo videos, then the most common reasons are related to the following settings.
- If you can embed your video, but when you want to view it, it doesn't play and shows an 'inaccessible' icon

then the option Privacy > Embed for the video is in Vimeo is most likely set to Nowhere or Specific Domains. Change it to Anywhere or add online.flippingbook.com to the list of Specific Domains. - If you use a custom URL (e.g. https://vimeo.com/flippingbook/first-flipbook) then kindly replace it with the regular URL (e.g. https://vimeo.com/410920085)
- If you add a regular Vimeo link (e.g. https://vimeo.com/410920085) but see an error that says 'Something went wrong. Please, make sure you insert a valid URL and try again.' then check the Privacy settings. If these are set to Hide from Vimeo or Password then
- Make the video Public with the Embed option set to Anywhere
- Copy the link and insert it into your flipbook
- Enable Hide from Vimeo or Password setting on Vimeo again
It is not possible to embed a video with Only me or Private settings enabled
Problems with adding Wistia videos
Wistia videos protected with private sharing cannot be embedded. If you temporarily disable private sharing, you will be able to embed such a video. But even if you then enable private sharing on Wistia again, the video will remain accessible to everyone in your flipbook. If you want the video to remain protected, then you can use the password protection in Wistia instead so that the embedded video would remain protected.
Problems with adding hosted MP4 videos
If you're trying to add a video to your flipbook using a direct link to the video file on a web server and you see an error, then first ensure that the video is an MP4. We don't support other formats (.mov, .avi, or .mkv, for example). You can convert videos to MP4 using www.freeconvert.com and select MP4 as the output format.
If the video is an MP4, the reason could be the web server’s security settings. Not all web servers allow the videos they host to be embedded on other sites, like FlippingBook. If the files are on your own server, you'll need to contact the administrator of the server and provide the following information.
To allow the video to be loaded, the following CORS headers need to be set for the video files served from your server:
Access-Control-Allow-Origin: *
Access-Control-Allow-Methods: HEAD, GET, POST
Access-Control-Allow-Headers: Content-Type, Content-Length
These headers ensure that your video can be accessed from any domain, including our platform. Alternatively, you can set the Access-Control-Allow-Origin to flippingbook.com so the videos can only be embedded into flipbooks but not in other sites.
Why does my video open in a pop-up window even though I set it to play inline?
If you set playback mode to Inline, your video could still be played in a pop-up window. This happens if due to technical limitations, it is not possible to use the Inline mode. It happens in the following situations:
- You view your flipbook on an iOS smartphone.
- You open your flipbook in Safari on a desktop.
- Your video is placed in the middle of a 2-page spread.
- Your video is less than 144 pixels wide or less than 100 pixels high. Note that the size of your page is changed dynamically, affecting the video as well. If your users resize the window of their browser or view on a screen with a different resolution, then this will affect the size of the video and thus the behavior.
In all other cases, your video will play inside your flipbook page in the Inline playback mode.
How does the autoplay feature work?
When Autoplay is enabled, your video should start playing as soon as you open the page on which you embedded it. However, to protect users from unexpected surprises, different browsers have implemented different ways to handle Autoplaying videos. Sometimes, they could even completely prevent your video from playing automatically. You can find the information on how videos from different hostings behave in different desktop and mobile browsers in the table below.
Refer to your browser's autoplay policy if videos don't Autoplay.
| Browser | Default autoplay policy |
| Google Chrome (desktop) Mozilla Firefox (desktop) Opera (desktop) |
Videos will autoplay but only after the reader interacts with the book, e.g. by flipping a page. |
| Safari (desktop) | No autoplay available |
| Microsoft Edge/Internet Explorer | Autoplay is supported for all videos |
| Mobile | No autoplay available |
How are links in my PDF handled?
When you upload your PDF to us, any text that either looks like a link or was specifically marked like it will be converted and added to the flipbook as an actual link. There are several types of links we support and extract by default:
- Links to websites. e.g. www.flippingbook.com or simply flippingbook.com
- Links to internal pages within a document
- Email addresses. e.g. support@flippingbook.com
- Phone numbers, provided that they are presented in the international phone number format. e.g. + 44 808 531 0544 or 0013474298704
As for the emails and phones, we also support the links that begin with mailto: and tel: respectively. When it comes to links to websites, we support both http:// and https:// and add the right protocol based on what you have included in the link. However, if you didn’t specify the protocol (http:// or https:// ), then we use https:// by default. This could be a problem in case your site doesn't support https. For example, if you have a link that says flippingbook.com, then we detect it as https://flippingbook.com. But since your site doesn't support https, you will see a security error in the browser when you click on this link.
This can be an issue if you have hundreds of links without a specified http:// protocol in your PDF. They will all be extracted as https://. The best solution would be to prevent this by specifying the links’ protocols in the first place. However, if you forgot to do that or didn’t know that it was necessary, then you can fix the broken links by manually replacing https:// with http:// in the Editor. Just follow these steps:
- Go to the Flipbooks tab in your account.
- Hover over the flipbook with broken links and select the Editor (video, links, etc.) option from the three-dot button menu.
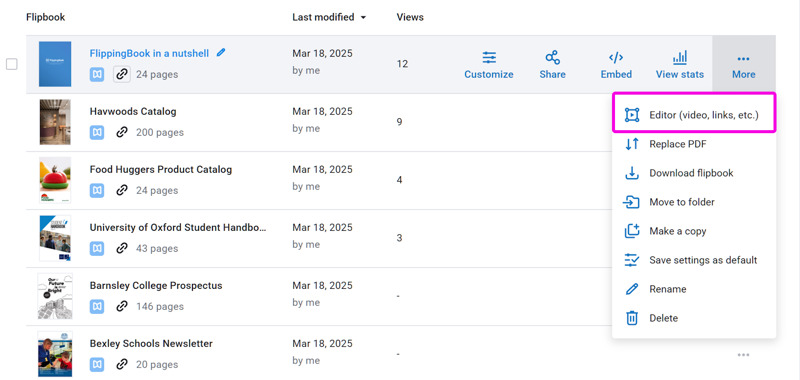
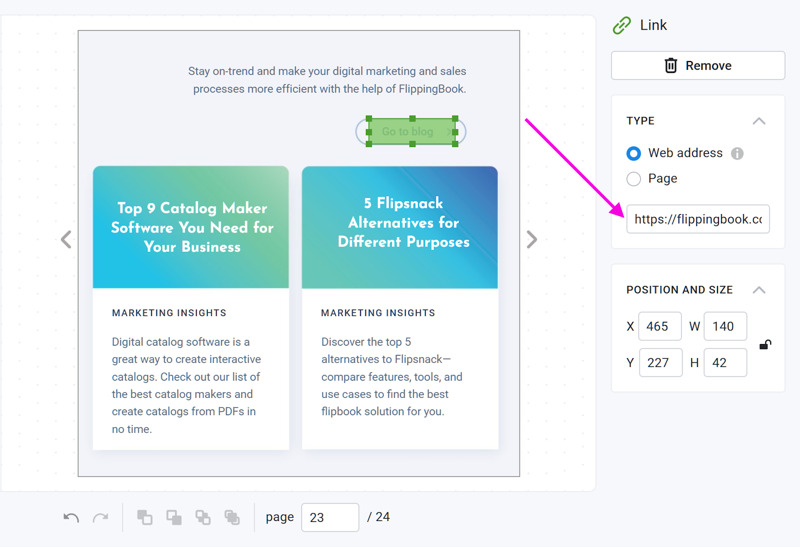
- Select the malfunctioning link by clicking on it.
- Edit the https:// part of the link in the Web address section.
- Click the Finish button to apply the changes.
Can I make my links more noticeable?
The Link Highlighting feature can be found in the Customize > Settings menu. It allows you to draw your readers’ attention to the links in your flipbook. When enabled, it works in several ways. The first, and obvious one, is that it highlights all the links for a short time when the reader opens the page.
The second is that it allows you to manually highlight all the links by clicking anywhere on the page. This could be especially useful if you have just a few hardly noticeable links that don’t get much attention. You can also try to improve the situation by customizing the highlight color and making your links stand out more.

You can also change the color that is used for highlighting links. You can find this setting in Customize > Branding > Color Palette.
A part of my text was recognized as a link where it shouldn't have been. What can I do about it?
You occasionally find some parts of the text to be recognized as links, where there should be just plain text. For example, you made a typo and forgot a space between the end of the sentence and the start of the next one. If the next sentence then starts with the word 'it', it would look like this: "This is an example.It shows how link-extraction can go wrong." If this text were part of your PDF, it would be extracted as example.it.
You can manually delete all the incorrectly extracted links from the flipbook as follows:
- Go to the Flipbooks tab in your account.
- Hover over the flipbook with broken links and select the Editor (video, links, etc.) option from the three-dot button menu.

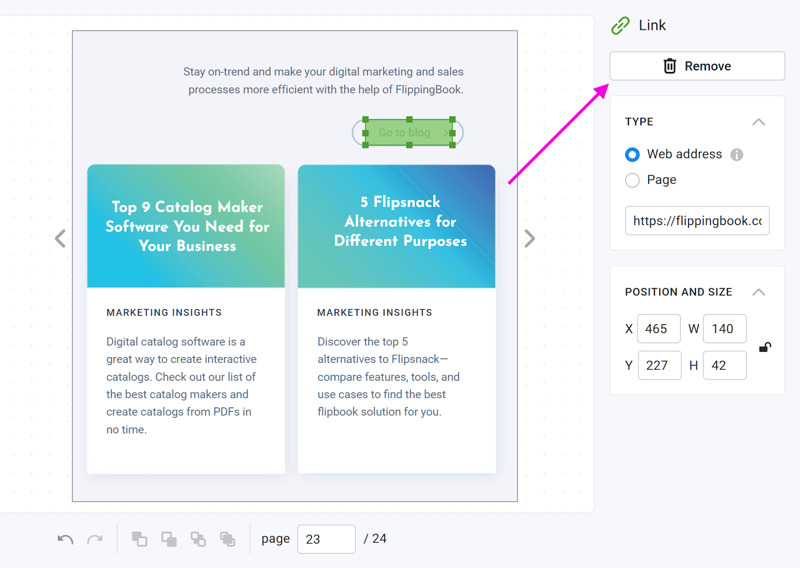
- Select the malfunctioning link by clicking on it.
- Click the Remove link button.
- Click the Finish button to apply the changes.
Will my links remain intact if I replace the flipbook with a completely different PDF?
If you replace your PDF with a completely new one (this feature is available in Starter and higher plans), then we will ask you to remove any links and other content you added. If you made any changes in the FlippingBook Online Editor, we recommend reading our article Can I replace my PDF without changing the URL?
Why do I see an error message when I try to add my picture to the flipbook?
We only accept direct links to images hosted on online platforms. If you see an error message, then you are possibly using a link to a page where the image is shown, instead of directly to the image itself. We can’t get the information about the actual image from that page. For example, the image below can be found at https://ibb.co/MD9m8VzR, but if we try to insert that link into the flipbook, we get an error.
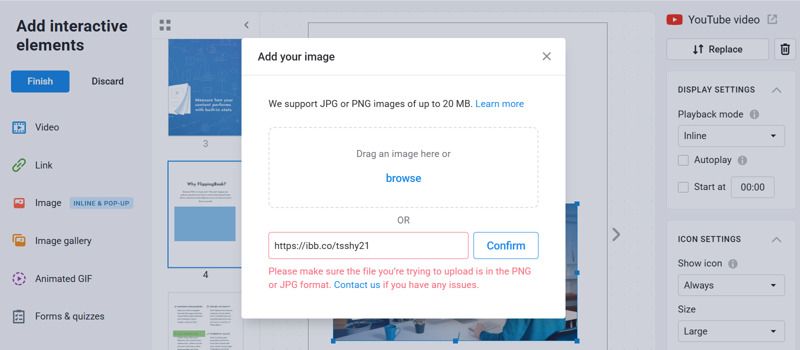
You can often find the direct link to the image by following the steps below:
- Paste the link to the image you’re now trying to add to your flipbook into your browser’s URL bar.
- Right-click on the image and select the Open image in new tab option.
- Copy the link to the image from the browser’s URL bar.
- Paste the link to the image in the Editor and press the Confirm button.
- Click the Finish button to apply the changes.