How to add forms to your flipbooks?
Using our FlippingBook Online product Optimal and higher you can add forms to capture data from your readers directly from the flipbook. Use it to include customer satisfaction questionnaires, marketing research polls, sign-up forms for events, knowledge tests, or HR surveys.
Let’s say you have an order form in Typeform. In the animation below, we show how this will look in your flipbook, first without the order form and then with the form.
Your clients can now submit their order details without leaving your flipbook.
Note! ⚠️ The services we support are Google Forms, Microsoft Forms, and Typeform.
Google Forms and Microsoft Forms can be useful if you are looking for a free and simple service to create surveys and forms. If you need an advanced service with the opportunity to add conditional questions or interactive elements, including images, videos, and sound effects, you can choose the service Typeform.
So if you want to add a form or any quiz to your flipbook, here is the information about the Forms & quizzes feature we cover in this article:
- Adding a form to your flipbook
- Choosing the display mode
- Choosing how to trigger the form
- Changing position and size settings
- Replacing the link to your form
- Google Forms limitations to be aware of
- Microsoft Forms limitations to be aware of
- Finding your captured data in Google Forms, Microsoft Forms, or Typeform
Adding a form to your flipbook
First, make your form in the platform of choice. If you're new to forms, here are the instructions on how to make a Typeform, Google Form, or Microsoft Form. After that:
- Go to the Flipbooks tab in your account.
- Hover over the flipbook where you want to add a form.
- Click the button with more options and choose Editor (video, links, etc.).
- Go to the page where you want to add your form. You can use the paginator at the bottom to quickly jump to a specific page.
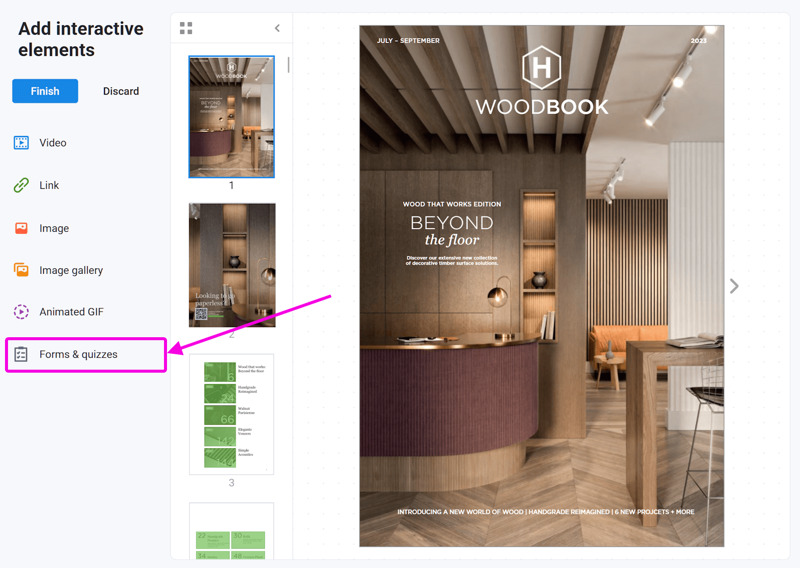
- Click on the button Forms & quizzes:
- This will open a pop-up window. Here you can insert the URL of a form created via any service that we support - Google Forms, Microsoft Forms, or Typeform:
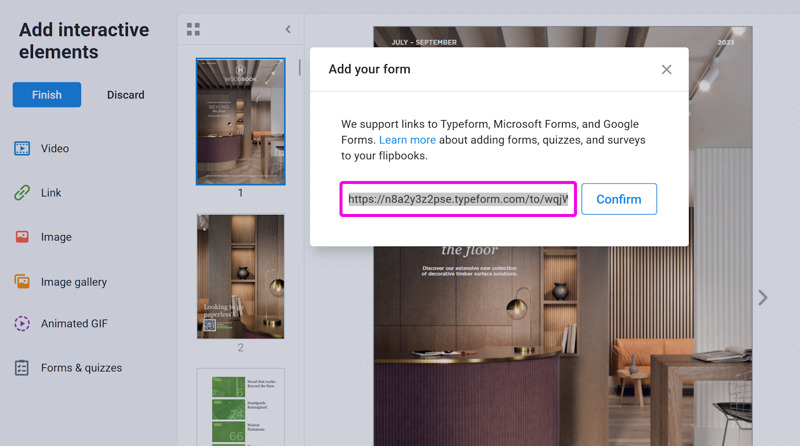
- After that, press the button Confirm to save the link.
Note! ⚠️ Make sure to always grab the form link. If you use the embed code of the form service instead, it won't work.
Once you have added a form to your flipbook, you can edit it in the menu panel on the right-hand side: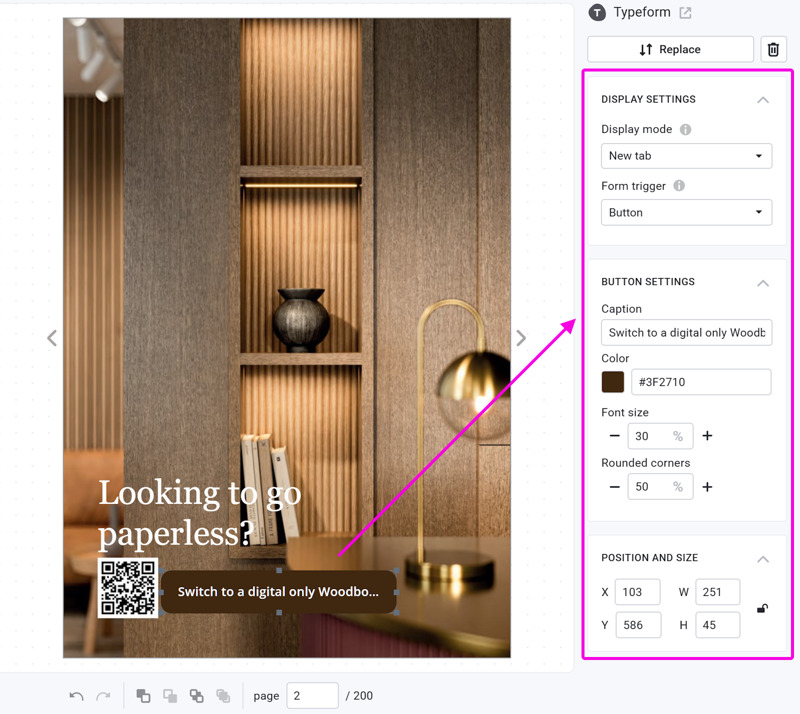
Choosing the display mode
You can set how your forms are opened: in a pop-up or a new tab. The default option is pop-up. This will open a new window with your form and move the flipbook temporarily to the background until your visitor closes the form. However, due to technical reasons, the pop-up option is not available for all forms. For example, forms that would launch another pop-up themselves, e.g., for authentication, can't be launched in a pop-up.
The size of your pop-up form windows can be:
- Large
- Medium
- Small
On mobile devices, the pop-up will always be large.
If you choose the option New tab, your form opens in a new browser tab for your visitor. Your flipbook will stay open in the original tab. Your visitor will have to close the tab with the form or switch back manually after completing it to return to your flipbook. We strongly recommend this option for forms that require the user to sign in!
Choosing how to trigger the form
You can trigger the form by adding either a button or a hotspot to your flipbook. Choose the option that is best suited for your flipbook in the Form trigger option.
- Button (default). Adds a button to your flipbook. You can change the text and appearance of your button with the following available options:
- Caption: the text that shows in the button.
- Color: enter an RGB color code or use the color pop-up that appears to select a color that matches your page.
- Font size: control the size of your text. You can use the + and - buttons to quickly adjust the size in steps of 10%, or enter a value manually for the final adjustments.
- Rounded corners: change the appearance of your button from fully rounded (100% as in the example below) to perfectly square (0%) or anywhere in between.
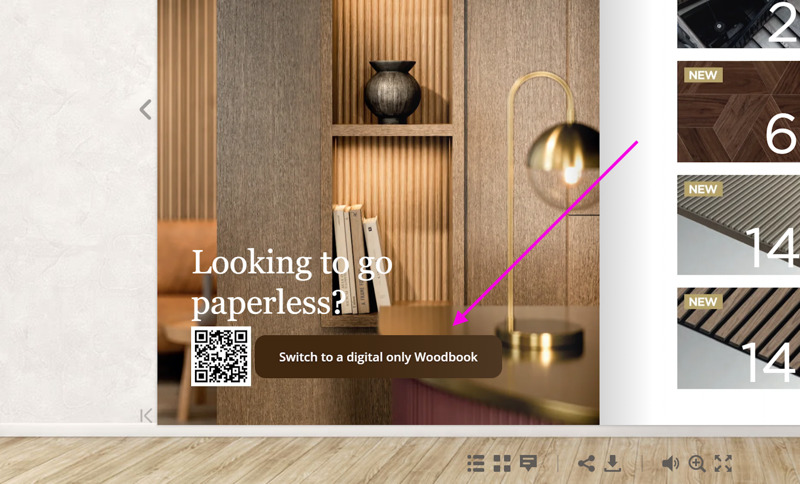
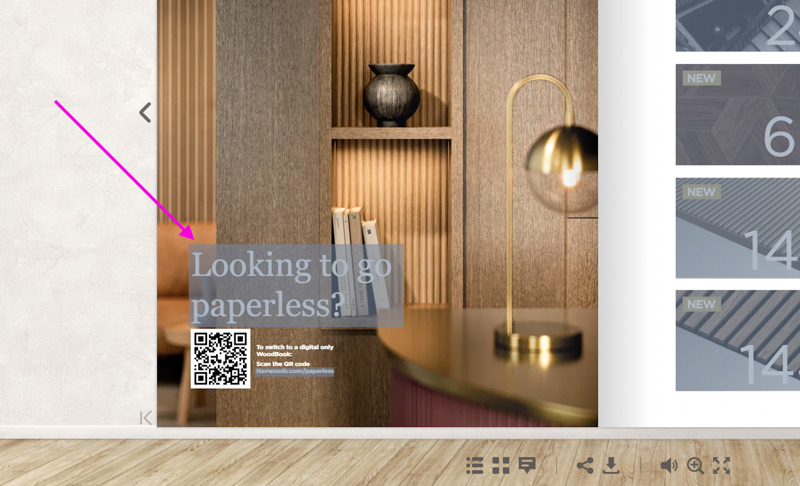
- Hotspot. This adds a clickable area to your publication, similar to a regular link that your visitors can click to open the form. In the editor, this appears as a great area that you can move over the page and resize as required by dragging the corners.
Changing position and size settings
In the menu panel on the right-hand side, we show the exact position and sizes of your forms. You can edit these values manually. So if you want several forms to be of the same size and aligned on the left, then you can:
- Change the first form to the ideal size.
- Write down the X value, width, and height of the first form.
- Manually edit the X value, width, and height of the other forms accordingly.
The button Remove will remove the chosen form from your flipbook.
Replacing the link to your form
The button Replace in the menu panel on the right-hand side allows you to change the link to your form. Just click on the form that link you want to change and click on the button Replace. Remove the current link and paste a new one, click on the button Confirm: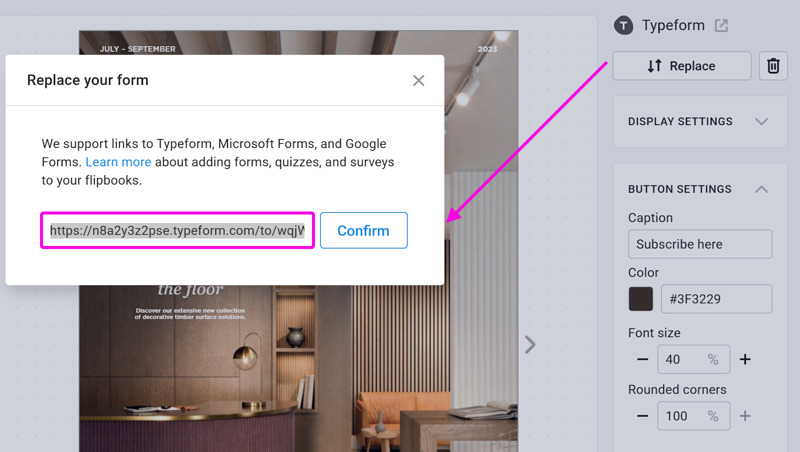
Google Forms limitations for your flipbook to be aware of
If you use Google Forms and open your form in a pop-up, then styling options like the header image and background color are not shown. (Google doesn't make these available in the embedded version.)
If you use Google Forms, we advise you (or the system requires you) to use New Tab if your form:
- is restricted to users in a specific domain;
- allows users to upload files;
- collects the user's email addresses;
- is set to a limit of 1 response per user.
In the first two cases, FlippingBook Online detects such forms and only allows them to open in a new tab. We can't detect the last two cases. If your readers complain that they cannot open the form, we advise you to change the display mode to New tab.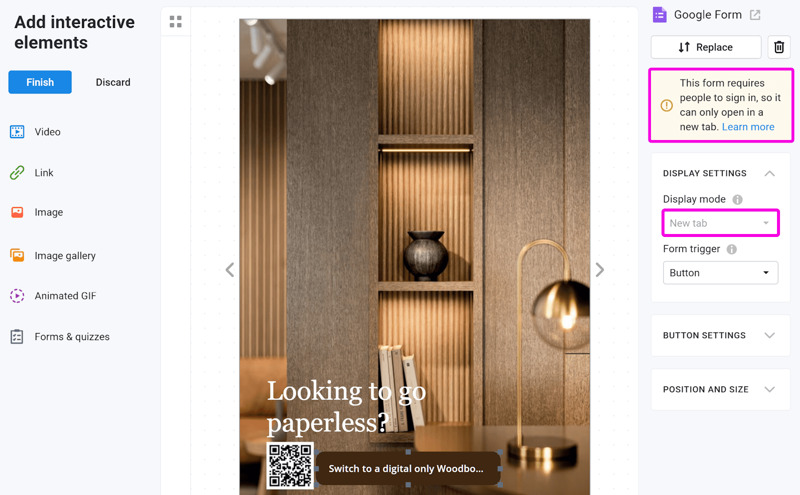
Such forms may work incorrectly in a pop-up because they require users to sign in. If your visitor isn't already signed in, this will trigger an additional pop-up. Since your form is already shown in a pop-up, this is not possible and will instead cause an error.
Microsoft Forms limitations for your flipbook to be aware of
If you add a Microsoft Form where only (specific) people in your organization can respond, then you can only select New Tab as the display mode. Opening such forms in pop-ups causes problems for users who are not logged in to their Microsoft account.
It is possible to add a form without restrictions as a Pop-up, and later set restrictions in Microsoft Forms. We only recommend this if you are 100% sure that all your visitors are logged in when they open your flipbook. Otherwise, they will be faced with error messages like "This contact is blocked. Contact the site owner to fix the error".
Other than that, we recommend you:
- Be careful if using time limits. Time-limited forms work incorrectly in Safari and in incognito/private mode.
- Not to add forms from other services to the same flipbook. This can cause an error message in the Microsoft form when your visitors want to fill it out.
Finding your captured data in Google Forms, Microsoft Forms, Typeform
After your customers or readers fill out your form, you will want to use their answers for further processing. If you're new to forms, here are links to help you find out where your captured data is stored:
- Google Forms - https://support.google.com/docs/answer/139706?hl=en
- Microsoft Forms - https://support.microsoft.com/en-us/office/view-results-of-your-form-22ea518c-b2f6-4824-bf8d-f14a6bba7d3c
- Typeform - https://www.typeform.com/help/a/working-with-your-responses-the-table-view-360029253732/