How to move content to other pages?
Shift Elements is a feature that allows you to move any content you have added to a flipbook (such as videos, links, images, etc.) in bulk by one or more pages. The main reason for doing this is when you add custom content to your flipbook and later replace the original PDF with another one. If you added or removed some pages from the new PDF, your added content elements can end up on the wrong page.
In this article, we will tell you about:
How to use Shift Elements
The Shift Elements feature is located in the bottom menu of the Editor.
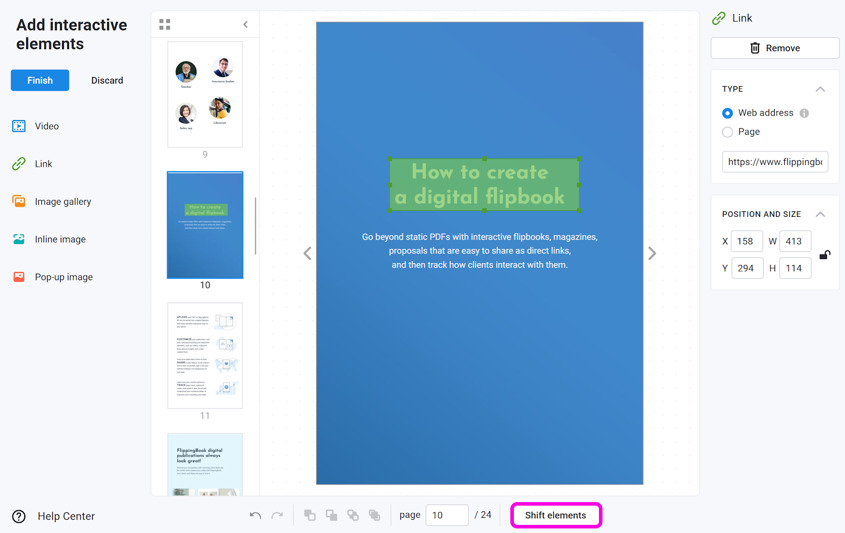
When you click on the Shift elements button, the Shift interactive elements window appears:
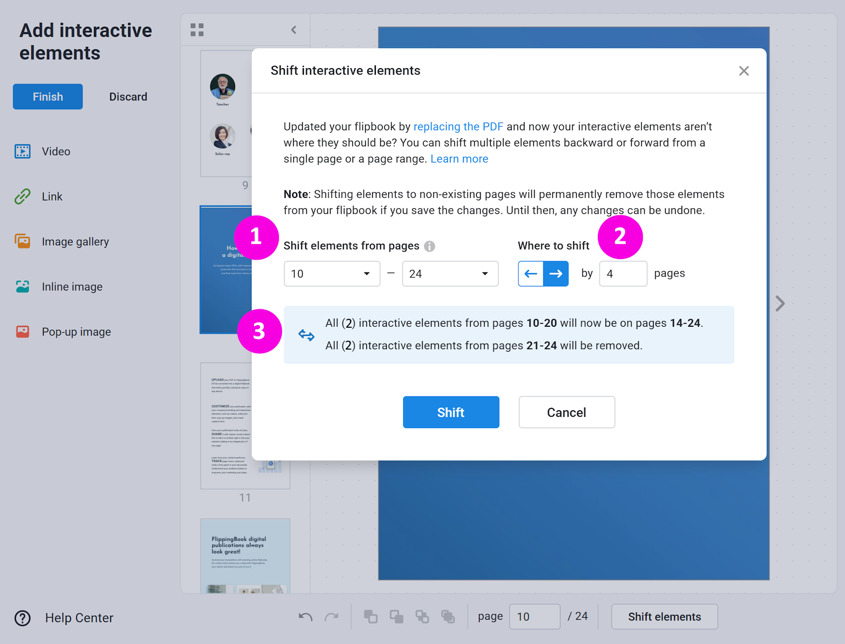
Here is what every field from the Shift interactive elements window means in detail:
- The section Shift elements from pages consists of two dropdown boxes. Here, you select the first and last page whose elements that you want to move;
- Under Where to shift, you click on the arrow (← or→;) to specify in which direction you want to move your custom content and indicate by how many pages you want to move it.
- The grey textbox below describes what will happen with your content when you click the Shift button. When you click the Shift button, your custom elements will be moved accordingly. Note that moving content to pages that don't exist will delete this content. This is a great way to get rid of content from pages you deleted from your PDF.
⚠️Warning! The Shift Elements function is a powerful tool that can move thousands of objects in hundreds of pages at once. We advise you to read these instructions carefully to prevent your content from ending up in the wrong places.
To use Shift Elements properly:
- Set the parameters and verify the effect in the textbox.
- Press the Shift button.
- Browse through your pages to visually verify if the content is in the correct position.
- If this is not the case, use the Undo button in the bottom panel to undo your changes.

- If everything is correct, press the Finish button. It is crucial to finish this way after you move your content and don't add any further interactive elements! If you want to make more changes, reopen the Editor after finishing.
Limitations of Shift Elements
We advise using Shift Elements only if the inner pages of your PDF are either all single pages or are all spreads, but not a mixture of differently sized pages. This can lead to unexpected results, as you can see below. First, let's look at a publication with only single pages. We move the content by two pages; everything ends up fine.
Next, let's look at a publication where all the inner pages are spreads (i.e., both the left-hand page and right-hand page are on one single page). Again, moving the content by two pages gives us the expected result.
Finally, we have a PDF with a mix of spreads and single pages. If we move the content by two pages, the content from spread 2 ends up on page 4. If that happens, there is simply no good way to handle it.
You can still use the Shift Elements feature, but we advise you to check the results carefully. You may need to make manual corrections.
Use cases and examples
Below, we show several examples where Shift Elements is helpful.
You added extra pages to your original PDF
Let’s look at a situation where you have a flipbook with added content, and then add more pages to your PDF. In such cases, we have to move the content forward to offset the added pages. In the video below, the small green boxes show where your content (links, images, and videos) was added.
- We insert 2 additional pages to the original PDF after page 2.
- After we replace the PDF, our content is still on pages 3 and 5. But our old pages 3 and 5 are now pages 5 and 7.
- To correct this, we shift the content starting from pages 3 - 5 to the right by 2 pages :
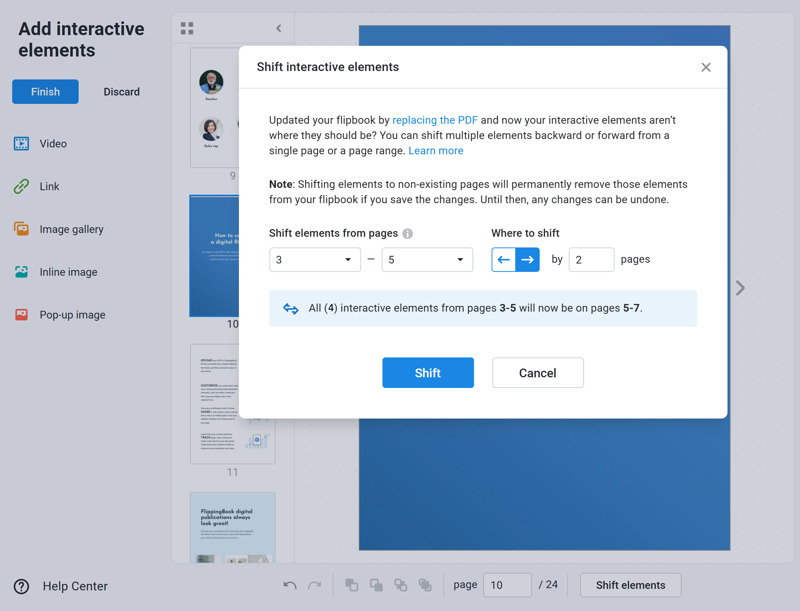
- After that, all our content is on the pages where it should be.
Use the calculator below to find out how to use Shift Elements if you add one or more pages (in a single range).
You deleted some pages from your original PDF
Now, let's look at an example of a flipbook with 5 pages where we remove some pages. In the video below, the small green boxes represent your content (links, images, and videos). If the deleted pages didn't contain any content, it's not too difficult. You can simply shift the content from trailing pages backward and then replace the PDF. But if the pages you are deleting also contain content, we first have to remove that. Let's look at an example:
- We again start with a 5-page flipbook with custom content on pages 2, 3, and 5.
- We intend to replace it with a PDF where pages 2 - 4 will be deleted.
- After that, only two pages will remain. Page 1, and our old page 5, which now becomes page 2.
- If we replace the PDF right away, page 5 no longer exists. But we can't move content from non-existent pages! That's why we move the content in the editor before we replace the PDF.
- First, we remove the content from pages 2 - 4 as these will be deleted. To do this, we Shift Elements from 2 - 4 to the right by 4 pages.
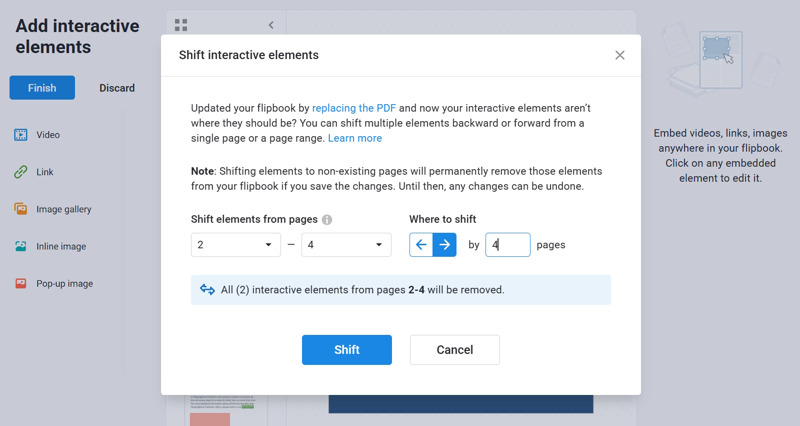
- This will move the content to (non-existent) pages 6 - 8, so it disappears.
- Next, we move the content on page 5 back to the correct page, which is page 2. We shift pages 5 - 5 to the left by 3 pages:

- Our content is now correctly positioned.
- We replace the PDF.
This example is intentionally kept simple to demonstrate the mechanisms. You can use the calculator below to see how you should use Shift Elements if you remove a page or a range of pages from your PDF.
Moving a range of pages within your PDF
If you move a page or a range of pages in your PDF to a new position, the situation can either be straightforward or get a bit more complex. If there is no added content on your pages, it's not too difficult. Just move the content on the pages that are moved as a result to the correct position.
It gets trickier if you have content added to most or all pages. In that case, the safest way is to
- Add pages to your PDF, equal to the number of pages you plan to move.
- Use Shift elements to temporarily park the content from the pages you plan to move to the newly added pages..
- Move the content on the pages that will be moved as a consequence of your primary move to the correct spot..
- Move the content from the parking pages onto the pages you primarily plan to move.
- Finally, replace the PDF with the one where the pages have been moved.
The animation below shows how that works.
Use the tool below to calculate how to move your content exactly
These are the most common situations when you need to use Shift Elements. If you plan to make more elaborate changes to your PDF (adding, moving, and removing several ranges) then we advise you to make these changes in small steps.