Tips and tricks in the Content Editor
FlippingBook Publisher allows you to add links, videos, pop-up images, and GIF files. However, there are several interesting possibilities in our Content Editor that may be useful to know.
Here are the main points we are going to cover in this article:
- How to select multiple objects
- Neatly align several objects
- Move objects quickly and precisely
- Arrange overlapping items
- Copy and paste several links from Excel
- Clone the interactive elements of your flipbook to other pages
How to select multiple objects
If you have several objects (links, videos, or images) in FlippingBook Publisher, you can select them all together by dragging a selection box around them. This is very useful when you want to make changes that apply to several objects. Here is how you can do it:
- Open FlippingBook Publisher and click the Content Editor button
- Click and drag a selection box around the objects you need to select
- You can now change settings for all the selected objects. You can also click inside the selection area and drag your objects where you want them to be placed.
You can also use keyboard shortcuts. Use Ctrl+A to select all objects. If you keep the Ctrl-key pressed down and then click on objects, it will add/remove them to/from your selection.
Neatly align several objects
It is possible to neatly align several objects horizontally or vertically. You can multi-select objects in the Content Editor and use the align buttons in the Settings dialog box:

It is also possible to align several objects pixel-perfect, horizontally or vertically, by changing X/Y coordinates.
For example, let’s say you want to vertically align all the objects relatively to one object (position all the objects neatly under one selected object). You can do it as follows:
- Open FlippingBook Publisher and click the Content Editor button.
- Select the object under which you want all the other objects to be placed and check it’s X value in the Link Settings. In our case, the X value is 54 px.
- Then multi-select all the objects you want to align and set their X value to 54 px.
- Now all the objects are placed precisely one under another.
Similarly, you can use the Y value to align objects horizontally (place all the objects at the same level).
You can also resize multiple selected objects of different sizes to a common height or width dimension.
For example, let’s say you want all your links to be exactly the same size. You can set the same width/height for several objects as follows:
- Open FlippingBook Publisher and click the Content Editor button.
- Select the object you want to use as a yardstick and check it’s W(idth) and H(eight) values. In our example, the W value is 631 px and the H value is 44 px
- Then keep the Ctrl-key pressed down, and click on objects you want to resize
- Set their W value to 631 px and H value to 44 px
- Press Enter. Now all your objects are equal-sized.
Move objects quickly and precisely
It is also possible to move item(s) with keyboard arrows by 1 pixel up/down or left/right. With the SHIFT key pressed down, you can move objects by 5 pixels using keyboard arrows. For the final corrections, this is often more convenient than using the mouse.
You can position objects with arrow keys as follows:
- Open FlippingBook Publisher and click the Content Editor button
- Select the object(s) you want to move
- Now use keyboard arrows to move your objects 1 pixel up/down or left/right. You can also press down the SHIFT key and use keyboard arrows to move objects 5 pixels up/down or left/right.
Arrange overlapping items
If you have two or more overlapping items on your page, e.g. a video and a link, then it’s not always obvious which object will be used when your reader clicks on the overlapping area. It is possible to control which element your readers can interact with if they click the overlapping area. You can bring an object to the top or bottom layer using these options:
- Bring to Front - brings the selected objects to the top layer. The readers can interact with the object in the top layer if they click the overlapping area.
- Send to Back - sends the selected objects to the bottom layer. The readers cannot interact with the object in the bottom area if they click the overlapping area.
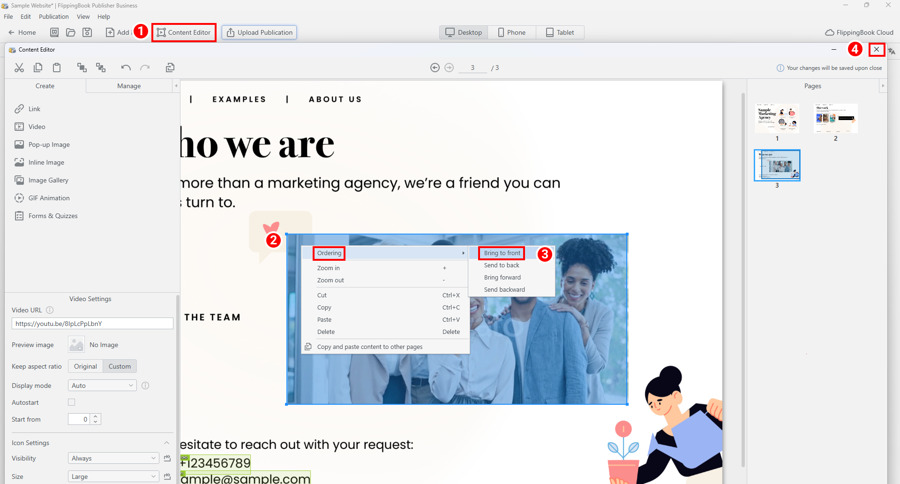
For example, you want a video that is overlapped with a link to be played:
- Open FlippingBook Publisher and click the Content Editor button
- Select the video object and right-click it
- Then choose the option Ordering > Bring to front
- Close the Content Editor window for the changes to take effect. Now, if you click on the video, you can actually play it.
Now, if you open Content Editor again and choose the option Ordering > Send to back for the video, you will not be able to play it anymore, because it is now in the bottom layer, and the link is in the top layer.
If you have several objects in your flipbook overlapping each other, and you want to move your object one layer forward or backward, you can use these options:
- Bring forward - brings one of your overlapping items one layer forward.
- Send backward - sends one of your overlapping items one layer back, e.g. if it was the first item, now it will be the second one to be shown.
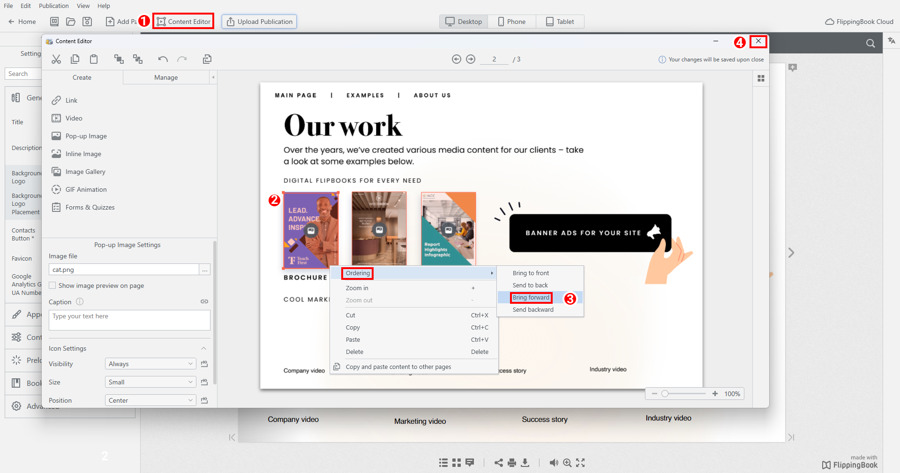
For example, let's say you have three pop-up images in your flipbook overlapping each other. Here is how you can make the middle image to be shown on top of the other images:
- Open FlippingBook Publisher and click the Content Editor button.
- Select the middle image and right-click it
- Then choose the option Ordering > Bring forward
- Close the Content Editor window for the changes to take effect. Now the middle picture will be displayed on top of the others.
Now, if you open the Content Editor again and choose the option Ordering > Send backward for this image, it will be shown in the middle again, because it is moved one layer back.
Copy and paste several links from Excel
If you have a big number of links to add to your flipbook, it is not necessary to add them one by one:
- Copy links from e.g. your Excel, Word, or Notepad file
- Open FlippingBook Publisher and click the Content Editor button
- Paste your links into the Content Editor
- Then you can adjust and place your links where you want them to be using the tricks we described above.
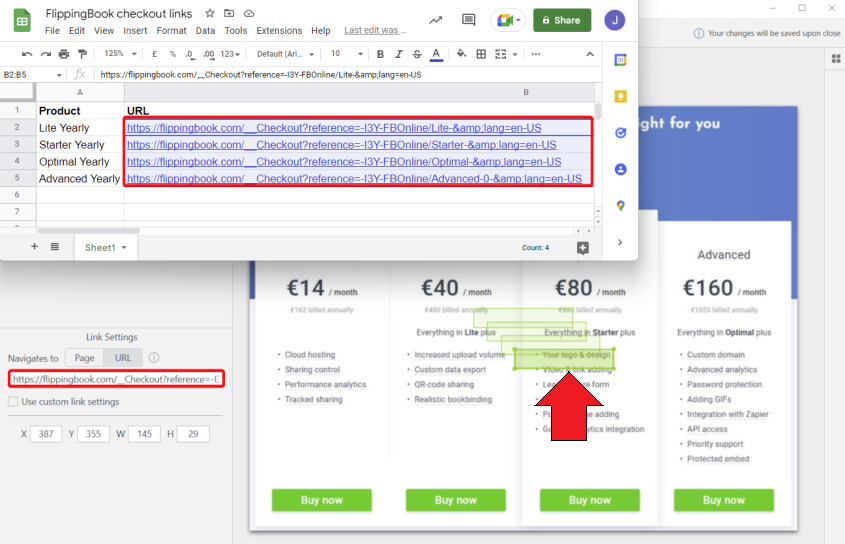
Tip! You can also copy/paste links to videos!
Clone the interactive elements of your flipbook to other pages
Starting with FlippingBook Publisher 2023.1 you can copy and paste the interactive elements of your flipbook to other pages without adding them manually. This can be useful if you add the same logos, watermarks, links, etc on every page. It will save you time and will help you to avoid mistakes. Here are the steps to follow to clone the same content to other pages:
- Open the Content Editor.
- Choose all the interactive elements for the page spread you would like to clone by holding the Ctrl button.
- Right click with your mouse and choose Copy and paste content to other pages.
- In the pop-up window, enter the page(s) where you would like to copy the interactive elements onto. (You can also tick 'paste content to every second page'. That is useful if you want the content to end up on even or odd pages only.)
- Click on the Copy button to copy and paste content to the chosen pages.