Advanced import options
When you import your documents into FlippingBook Publisher, most of the time you can simply use the default settings for conversion. However, sometimes you might need to fine-tune import settings. This can be useful, for example, if you have a very large and complex PDF and you want to reduce conversion time or decrease the size of the resulting publication. In other cases, you might want to specify how certain elements of your documents, such as links and wide pages, need to be handled during import.
In this article, we will tell you about:
- Selecting a conversion profile during import
- Understanding the Import options
- Understanding the Conversion settings
- Setting default import profiles
Selecting a conversion profile during import
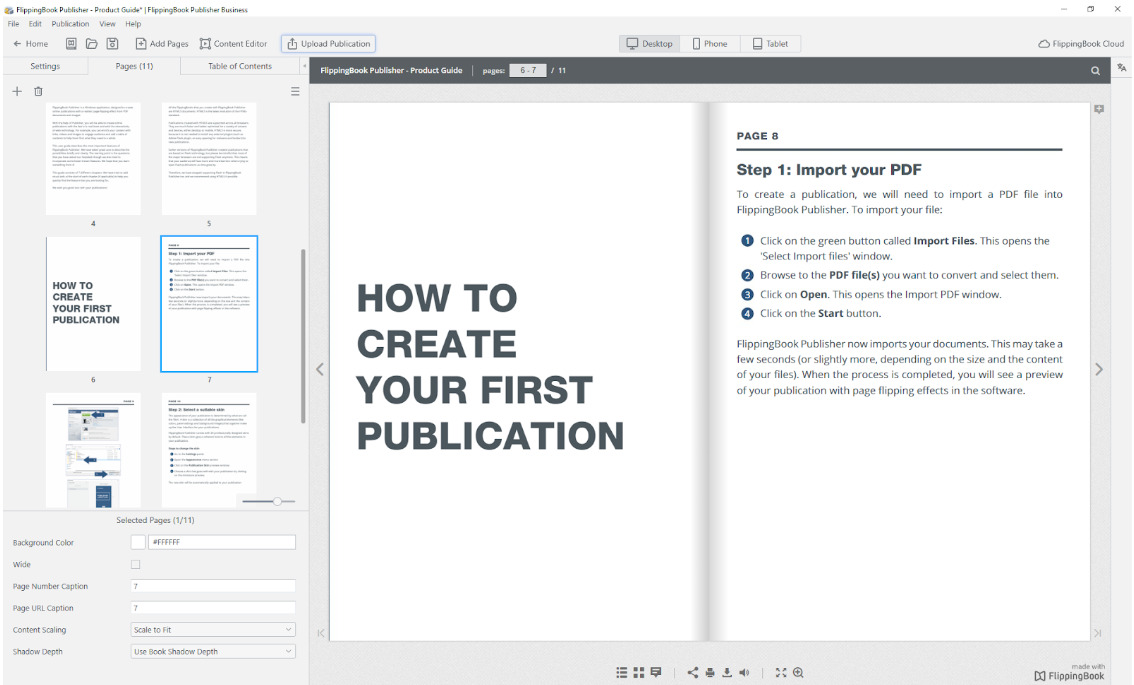
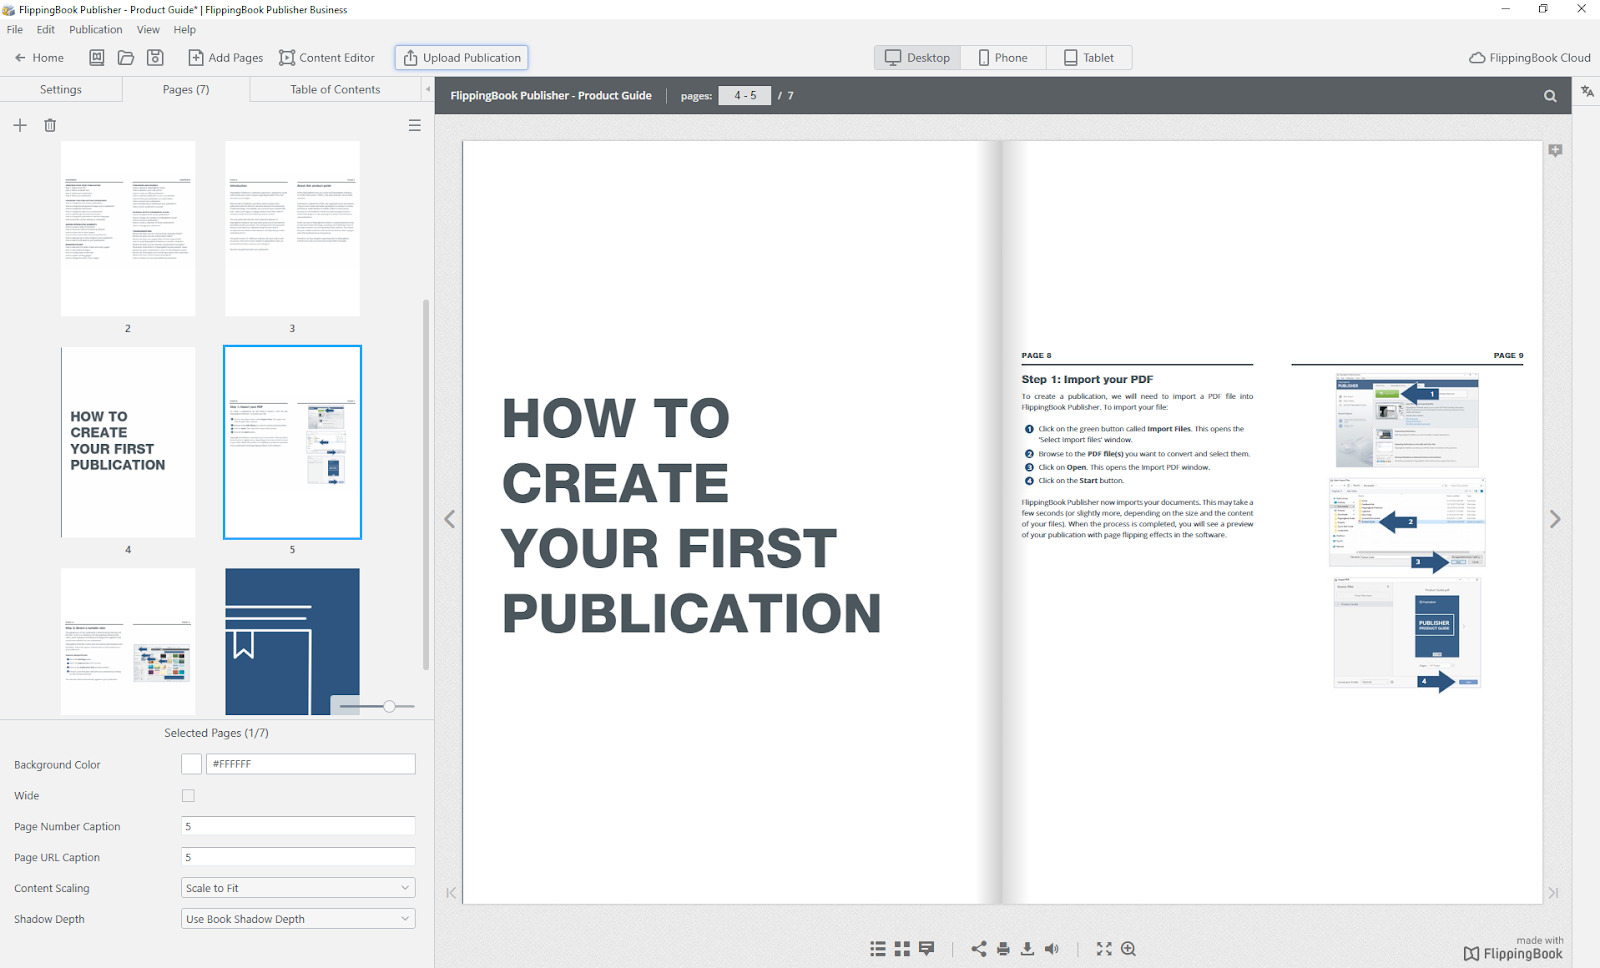
To start the import, open the File menu and choose the Import PDF file or Pictures option. Alternatively, you can press the Import files button on the FlippingBook Publisher start page.
After you choose the files, you will see the import dialog where you can select a conversion profile:
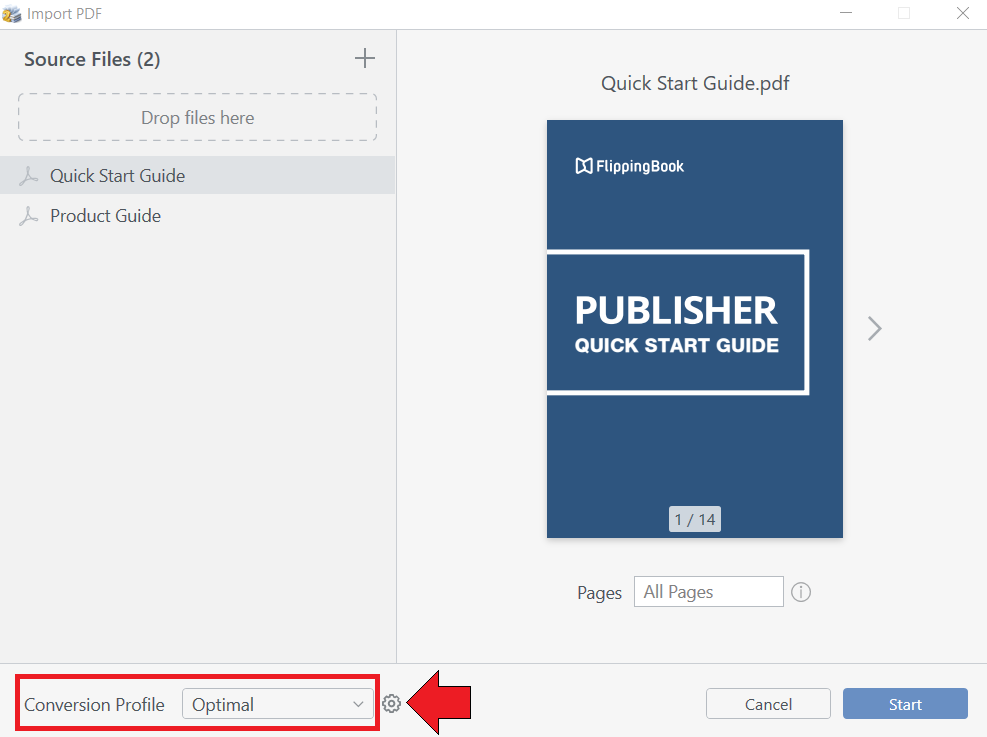
You can select one of the predefined conversion profiles:
- Optimal - default profile, provides the optimal balance between publication size and quality
- Best Quality - use this profile to maximize publication quality
- Small File Size - use this profile to minimize the size of the flipbook
- Fast conversion - use this profile to decrease conversion time
If you want to view the settings for your selected profile or probably create a custom profile, press on the cogwheel next to the Conversion Profile field.
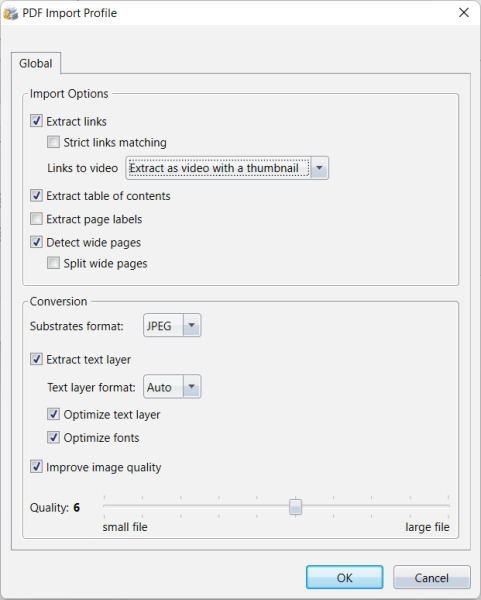
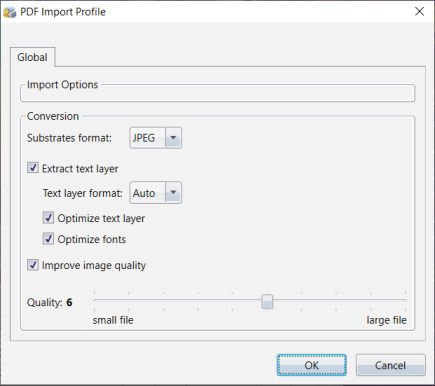
If you are importing PDF file(s), you will see the PDF Import Profile dialog, where you can view and change your Import Options and Conversion settings:
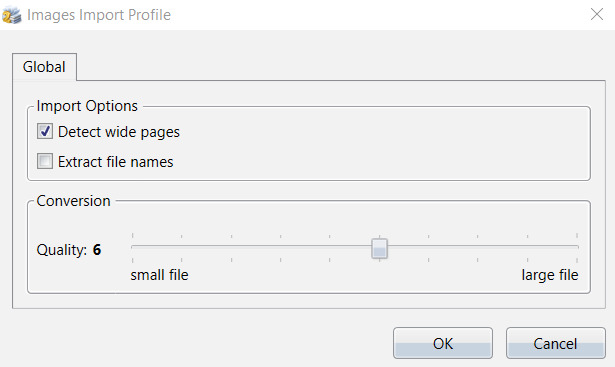
If you are importing pictures or photos, you will see the Images Import Profile dialog instead:
Customized settings are saved as a custom conversion profile, which can be reused in other projects.
Let’s now look at Import Options and Conversion settings in detail.
Understanding the Import options
Extract links
If the Extract links option is on (which is the default setting) then all text in your PDF that either looks like a link (e.g. flippingbook.com) or is specifically marked as a link is (e.g. link to our website) will be converted to links in your flipbook as follows:
- If your links contain a protocol (e.g. http://flippingbook.com) then the protocol that you specified is also used for the extracted link. But if you did not specify a protocol (e.g. flippingbook.com, so without the http or https prefix), then we will add https:// as the default protocol. Note that if your site does not support https, then the link will not work!
- If this concerns just a couple of link, then we advise you to manually edit these links in the Content Editor and change https to http.
- If this concerns a large number of links, then we advise you to change the default setting to http.
- Email addresses are extracted normally
- Telephone numbers are extracted if they are in the international phone number format (i.e. starting with + or 00 and a recognized international access code).
The Strict links matching option allows to:
- extract links to websites starting with http/https or www
- extract text specifically marked as a link in the PDF
- extract phone numbers only if they are preceded by the tel: prefix
Below, you can see some examples showing how this works:
| Example | Extracted as | Extracted with strict links matching? |
| flippingbook.com | https://flippingbook.com | No |
| http://flippingbook.com | http://flippingbook.com | Yes |
| www.flippingbook.com | https://www.flippingbook.com | Yes |
| https://www.flippingbook.com | https://www.flippingbook.com | Yes |
| Visit our help center | https://flippingbook.com/help | Yes |
| tel:555-555-1234 | Not extracted (no international number) | No |
| call us at (555) 555-1234 | tel:5555551234 | Yes |
| +1 (555) 555-1234 | tel:+1 (555) 555-1234 | No |
| 0015555551234 | tel:0015555551234 | No |
| tel:00-1-555-5551234 | tel:00-1-555-5551234 | Yes |
| example@email.com | mailto:example@email.com | Yes |
Finally, the Links to video setting specifies how video links in your PDF are handled. If your links are clearly textual, then we extract them as normal links. But if the links look like you want to show a full video, then we immediately embed them as videos. This happens when the area is square enough and large enough in relation to your page.
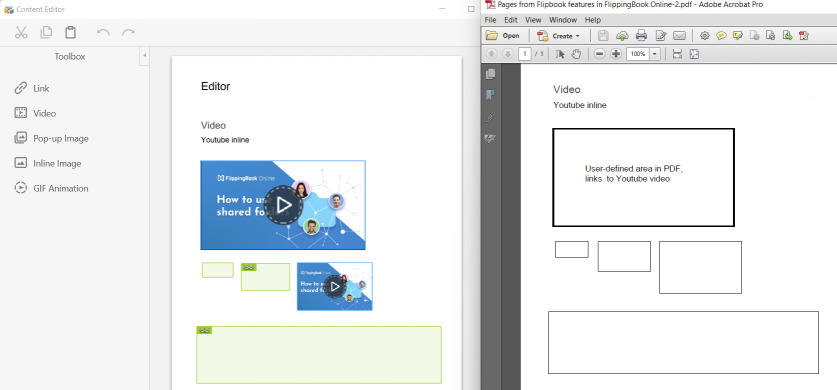
In the example above, our PDF (on the right) contains 5 identical links to the video.
- The video in the top row is both large and square enough and extracted as an embedded video in Publisher (on the left).
- In the middle row, the two leftmost videos are not big enough. We still extract them as regular links to our video on YouTube. The rightmost video is big enough and extracted as embedded video.
- The video in the bottom row is big enough, but not square enough. It is still extracted as a regular link.
You can change the import setting and choose to:
- Extract as video with a thumbnail (default).
- Extract as video without a thumbnail. Use this option if your PDF already contains a suitable image.
- Do not extract video. This will extract your videos as regular clickable links but not directly embed them into your flipbook.
Note Videos will only be extracted if you are connected to the internet when you import the PDF. Also, only public videos are extracted.
When you disable the Extract links option, no links are extracted at all, not even if there is a hyperlink in the PDF itself.
Extract Table of contents
The table of contents will by default be created from your bookmarks. Disabling this option means that no table of contents will be created. Our dedicated Table of contents article describes all the ins and outs.
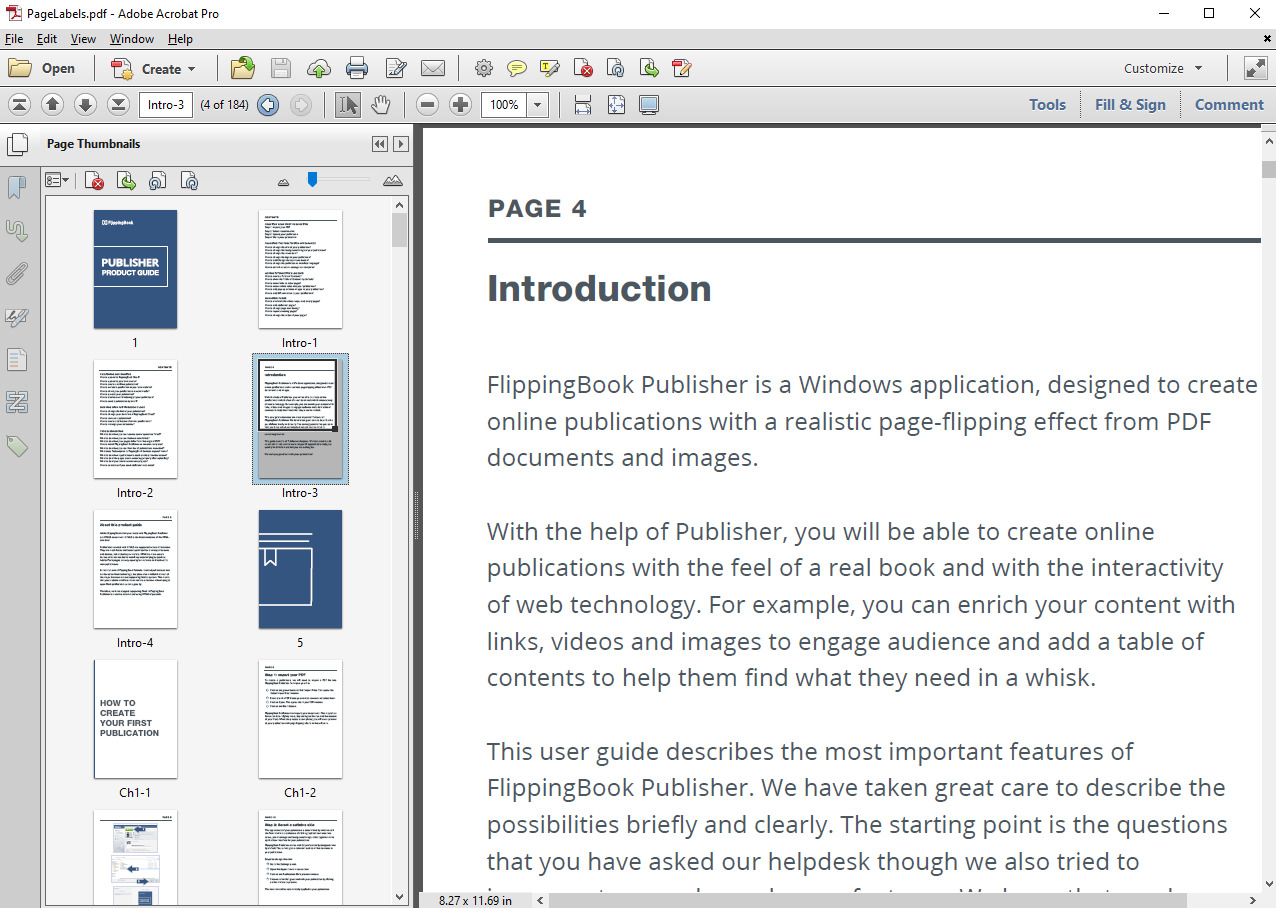
Extract page labels
By default, when you import a PDF we number the pages with Arabic numerals, starting from 1. You can create an offset for the first few pages in Roman numerals. But if your PDF has a very specific page numbering/naming scheme that you’d like to retain in your publication, then you can also use that instead of the default numbering.
To do this, enable the Extract page labels option.
Here is an example of a PDF with non-linear page numbering and how it is imported in FlippingBook Publisher:
Detect wide pages
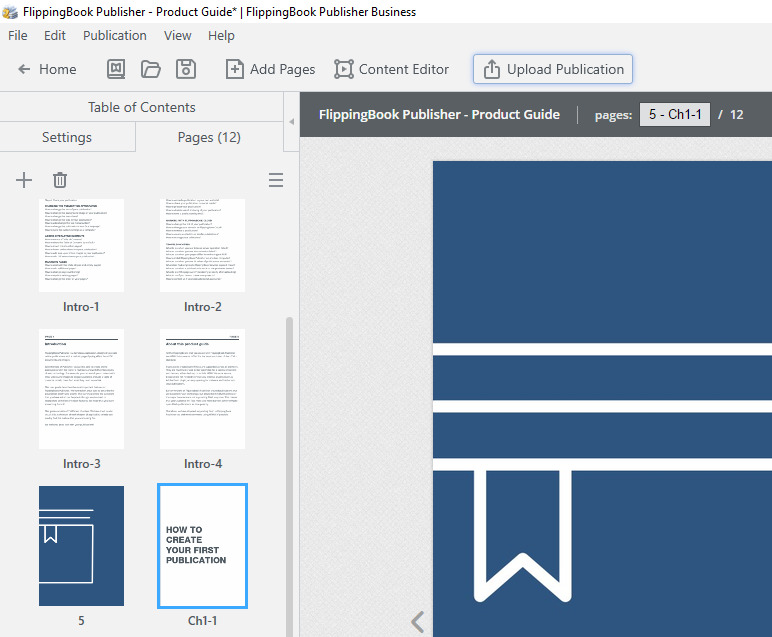
Most PDFs consist of pages of the same size. But some PDFs have pages of different sizes. The most common reason is the use of ‘spreads’ where information on two opposite pages is intended to be shown together. You can see an example of such a PDF in the screenshot below:
The default setting in FlippingBook Publisher is to detect wide pages and keep them together. This sometimes causes a bit of a challenge, because an open book by definition consists of 2 pages. In such cases, we add an additional empty page so that we can keep your spreads together and at the same time keep the integrity of the book intact.
In the example below, pages 4 and 5 are kept together. After page 6, we insert an empty page 7, so that we then can keep pages 8 and 9 together as well:
![]()
If you don’t particularly care whether or not the content on such wide pages is kept together (and/or really want to get rid of the empty pages, no matter what), then you can enable the Split wide pages checkbox. This splits the spreads into single pages so no empty pages are needed. However, this means that the content of the spreads may be split over different pages like in the example below:
If you disable the Detect wide pages checkbox, then every page in your PDF is treated as a single page, no matter what the size is. Since all the pages in a book need to have the same size, this means that the wide pages have to be resized to a single page. The consequence is that some empty space is added at the top and bottom of the page.
How to use http as default when extracting links?
When your PDF contains links that don't contain a prefix for the protocol (for example, you use a link like flippingbook.com) then we by default add the prefix https:// to such links. This can be very inconvenient if your PDF contains lots of non-prefixed links, but the site where these links lead to doesn't support https. Your links will simply not work! The browser will give a security warning when trying to open them. In this case, you can change the default setting as follows:
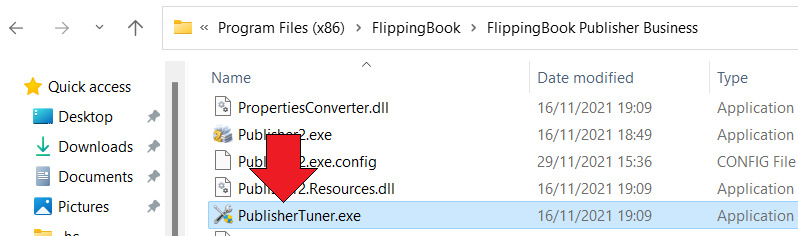
- Close FlippingBook Publisher.
- In the standard File Explorer, go to the FlippingBook installation folder (default: C:\Program Files (x86)\FlippingBook\FlippingBook Publisher <edition>).
- Start the PublisherTuner.exe app in this folder.
- Go to the Import Settings tab.
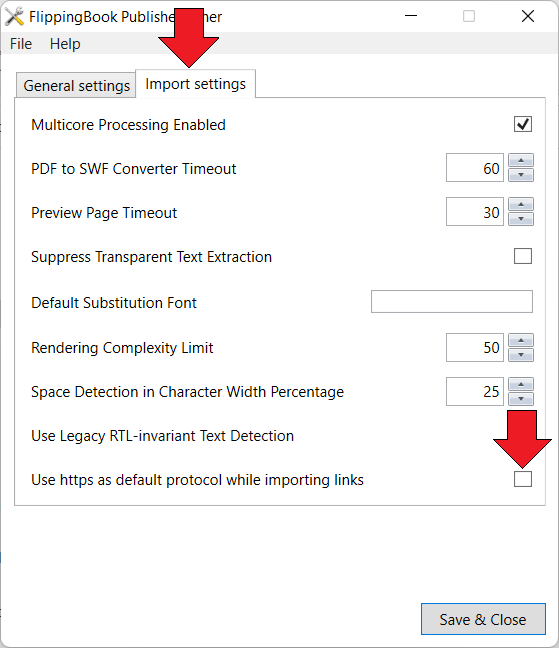
- Uncheck the checkbox after Use https as default protocol after importing links.
- Press Save & Close.
- Start FlippingBook Publisher and import your PDF or reconvert your pages as follows:
- Open your project file.
- Go to the Pages tab.
- Click on any unselected page. Then press Ctrl+A. This will select all pages. You can also manually select just the affected pages.
- Right-click, select Import > Reconvert Selected Page(s)...
- Click Start.
Note! We advise you to change this setting back after reconverting your pages. Otherwise, in future projects, unprefixed links will also be imported as http. This may reduce the security. We also reset this setting if you reinstall/update FlippingBook Publisher.
Understanding the Conversion settings
This part is highly technical and intended for designers who want to fine-tune the import results. For the vast majority of users, there is no need to change these settings.
Introduction
When you convert your PDF to a flipbook, your pages are converted to images.
When you look at a page you will see 2 images:
- An image that contains all the text but is otherwise transparent. This image is called the text layer.
- An image that contains everything else (pictures, lines, boxes, colored backgrounds, etc.). This image is called the substrate.
These images are shown together: the transparent text layer on top, the substrate below it.
Substrates format
The substrate layer is by default created as a JPEG image. JPEG is a very efficient format for photos. The typical file size is 5-10 times smaller than PNG (the other option) while the difference is not generally distinguishable by the human eye.
On the other hand, JPEG is less suitable for sharp objects. The side effect of the compression is that the edges of sharp objects can become a bit blurry.
Below, you can see an example of a highly zoomed version of a PNG image (left) and the same image as JPG (right):

For such images, PNG is not only true to the original image. It is also more efficient in such cases, though the absolute difference is much smaller than with photos.
So if you have pages that contain sharp geometric objects (lines, boxes, logos) but no pictures, then you can reconvert the substrate as PNG for those pages. They will look better and the size of the file will probably be a bit smaller too.
Extract Text layer
The text layer is by default set to Auto. This means that we try to convert the text to an SVG (Scalable Vector Graphic) image, if possible. SVG is a wonderful format. Its design allows text to be crystal clear whatever the zoom level. You can even show the text on a billboard and it would not show any pixelation at all.
However, due to technical limitations, it is not always possible for us to convert all text to SVG. If some text can’t be converted to SVG, then we have to put it in the substrate layer instead. The result can vary from ‘hardly noticeable’ (just a page number in the bottom corner) to ‘very noticeable’ (one line is very sharp SVG, the next one blurry JPEG).
If the result is ‘very noticeable’, then you can disable the ‘extract text layer’ option. We advise setting the substrate format to PNG in such cases.
Here is an example:

In the first image, some of the text is very blurry (JPG), whereas the rest is sharp (SVG). In the second image, everything on the page is converted as PNG without text extraction. The overall quality is slightly lower but more consistent.
Optimize text layer
If the SVG layer is successfully created, we optimize it so that browsers process it faster, creating smoother page-flip and zoom effects. In very rare cases this optimized SVG is not processed correctly by specific browsers. Your text could look perfect in Chrome, but in Safari some characters may overlap, use a wrong font, or the wrong size. In such cases, reconverting the page without the Optimize text layer option can help.
In cases where reconverting without an optimized text layer still doesn’t help, it is possible to switch the Text Layer Format to PNG while keeping the substrate in JPEG. This is the best solution if your PDF also contains many images. In this case, converting the substrate as PNG may increase the file size of a single page to several megabytes.
Optimize fonts
The 'Optimize fonts' option is similar to the 'Optimize text layer' described above: to solve problems with complex fonts that are not rendered correctly in your flipbooks. However, we advise you to use this option with much more care than the 'Optimize text layer' described above. Not optimizing the text layer will at worst make the performance of the flipbooks slightly worse. But not optimizing fonts may actually introduce problems with text being rendered incorrectly, whereas it would be rendered correctly when the font was optimized.
We advise you to only reconvert pages without font-optimization if you actually noticed problems with text.
Improve image quality
When images in your PDF are converted to images in your flipbook they have to be resized and sometimes converted to another format as well. This can be done in dozens of ways, depending on e.g. how the resampling is done. Generally, the results will be very similar and you will zoom in to the maximum and compare the smallest details to notice any difference.
We didn’t add dozens of ways but basically chose two presets. The one that we like best for most images is the default option “Improve image quality”. If you disable this option, we will use the second preset instead. So should you for some reason not be happy with how your images look, then you can try to reconvert them without the option to ‘Improve image quality’.
Quality Slider
The quality slider affects the amount of compression of the substrates if they are in JPG format (there is no difference at all if you use PNG as the substrates format). Even the minimum settings still produce very decent images, where you have to zoom in to the maximum to see any difference (mostly fine details and sharp edges). The filesize can become considerably smaller at lower levels.
For those familiar with JPEG compression, the slider will have a JPEG compression level of about 78% when set to 1, and about 95% when set to 10. The default setting is 6, and the actual file size reduction/increase can be around 25% less when set to 1 and 25% more when set to 10.
If your publications contain lots of photos and file size and/or bandwidth are an important consideration then you can safely experiment with lower quality settings.
Setting default import profiles
If you want to choose import profiles that will be used by default, you can open the Edit menu and choose the Preferences option. In the Preferences dialog, click on the Import tab:
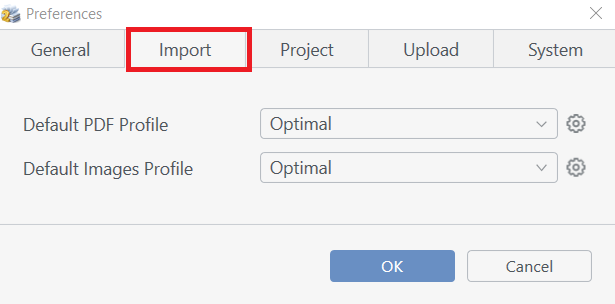
Select default import profiles for PDF and Image files. You can use one of the built-in profiles or a custom profile.
Related articles