Image Gallery in-depth
With FlippingBook Online Optimal and higher, you can use our Image Galleries feature to group several images in one.
Image Galleries are a great tool if you want to show more about e.g. a product, but want to save space on the page. Interested visitors open the gallery to find everything they want in every detail about this product. People who are not interested are not distracted and can simply move on to their favorite product.
Our Image Gallery feature comes in handy for:
- showing products in a catalog in different colors, from different angles, or in close-ups;
- real estate brochures (several photos of a property for sale, all facilities in a hotel room, etc.);
- presenting multistep processes, such as assembly or maintenance instructions, in user manuals;
- adding side stories in the context of the main publication (e.g., biographies in corporate journals);
- explaining complex charts with extra images to highlight key points or drill down into more detail;
- any other collection of related images that doesn't fit into your main PDF!
Our article How to add videos, links, and images to my flipbook? shows you the basics of adding image galleries to your flipbooks. In this article, we will look into some important details about the feature. Here's what we'll cover:
- Sizing and aligning your Image Gallery
- Controlling the icons
- Setting up display settings
- Editing gallery content
- How content appears in the pop-up carousel
Note! ⚠️You can add up to 50 PNG /JPG images to your Image Gallery. The size of individual pictures should be not more than 20MB.
Sizing and aligning your Image Gallery
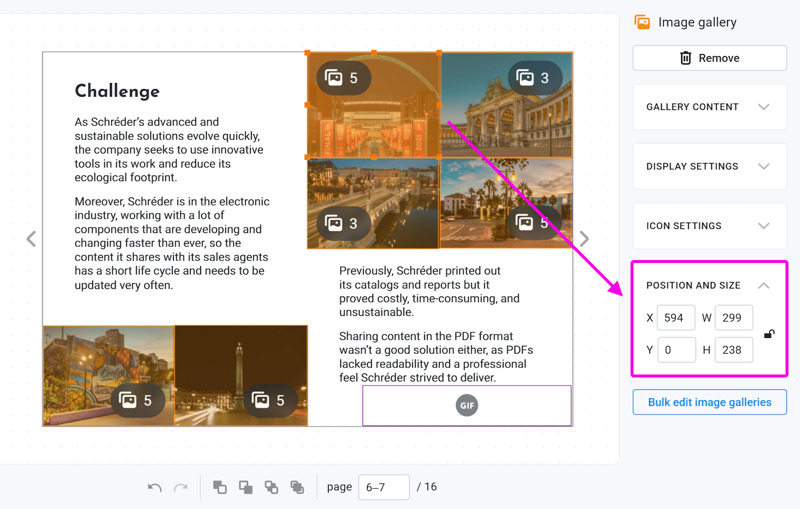
The standard way of sizing galleries is to move them around with your mouse and drag the corners. Note that we keep the aspect ratio of the first picture. You can click on the lock icon in Position and Size to unlock that and resize it to the desired size. You can also use the arrow keys to nudge your gallery in any direction by a single pixel.
If you have several elements on your page that you want to align perfectly, you can edit the size and position values for your Image Gallery manually. So if have two Image Galleries on your page, and want them to be of the same width, and aligned on the left, then you can:
- Change the image of your first Image Gallery to the ideal size.
- Write down the X value and width of the first Image Gallery.
- Manually edit the X value and width of the images of your other Image Galleries accordingly.
If you want to align your Image Galleries horizontally, give them the same Y values and height instead.
Controlling the icons
By default, we add icons to Image Galleries to help your readers notice them. You can change their size, position, and behavior in the Icon Settings section in the panel on the right-hand side. If you need additional info about how they work, take a look at our article Icon settings. If you want to change the settings for all the Image Galleries in your flipbook, then our Bulk change option is for you!
Setting up display settings
We show a preview image of the first image in your gallery by default. You can change your preview image, by moving another image to the first place. The preview will be updated. If you don’t need the preview image at all, you can clear the checkbox Show Preview in the menu panel on the right-hand side.
Tip💡If you want to use another image than the first one in your gallery as a preview image, you can disable the Show preview and instead insert your desired image as an inline image. Make sure to layer them correctly so your gallery remains clickable!
Editing gallery content
To edit your gallery content, select your gallery and click on the Manage Gallery content button in the Gallery Content block:
Once you click on the button, a pop-up window will appear. You can add, move, or delete your Image Gallery pictures here:
- If you want to remove an image, you can do it by hovering over it and clicking the cross icon.
- To move an image, click on it, and drag it to its new position.
- To add an image, click on the Choose images button.
When done, don’t forget to click on the button Save.
How content appears in the pop-up carousel
When your readers open a pop-up image or an image gallery, they can see all content in a carousel-like view. After viewing all images in a gallery, users can continue browsing through all other galleries and pop-up images on the opened page(s). There is a gap between the elements and the numbering restarts. If the content is completely unrelated, this may not be suitable or even confusing. In that case, you can switch off the option In-page Media Navigation on the Layout & Interaction group. If you do so, all galleries and pop-up images in your flipbook will be opened in their own individual pop-up.
In the example below, we have the In-page Pop-Up Navigation on. Both Orchestra and Choir galleries are shown together.
After we switch off the In-page Pop-Up Navigation, galleries can be viewed now individually.