No document longer than 20 pages can do without some sort of navigation. Especially, a PDF. A paper brochure or a catalog can at least be quickly flipped through, but a PDF file has to be scrolled down—a tedious and irritating process.
So if you want to make your document easier to use, you need to add bookmarks to it. In this article, we’ll explain how you can do this in Adobe Pro, Microsoft Word, and Preview. Plus, explore some helpful navigation tools beyond bookmarks.
What are bookmarks in a PDF?
The name ‘Bookmarks’ can make you suspect it’s something a reader should add. At least, that’s how it happens with paper books: they rarely come with predesigned bookmarks. However, what they do come with are tables of contents that help you find a specific chapter or a part of the text.
And that’s what bookmarks in PDFs truly are—they are a structure of your document with parts, chapters, etc. that allow the reader to get a sense of the document’s contents and quickly jump to a relevant section without manually scrolling through to find it.
#1 Adding bookmarks in Adobe Acrobat
Here’s how to add bookmarks to your PDF document with the original PDF editor:
- Open your document in Adobe Acrobat.
- Go to the document page you want to bookmark.
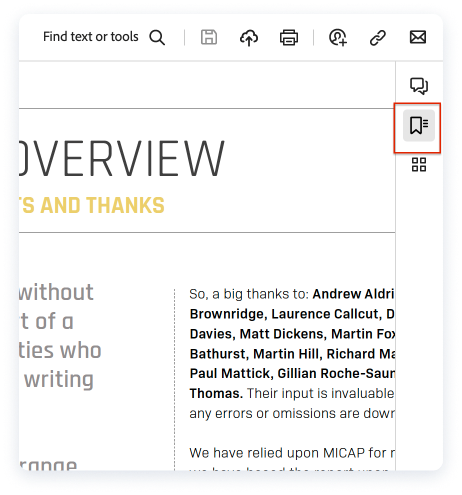
- Click the Bookmarks button in the right panel.
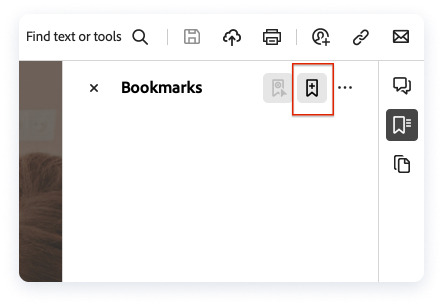
- Click the New bookmark button on the top of the panel.
- Type in the title of a section of your document.

- Repeat the process for all the pages you want to link to.
Editing existing bookmarks in Adobe Acrobat
If you need to change the destination of any of your bookmarks, here’s how you do it:
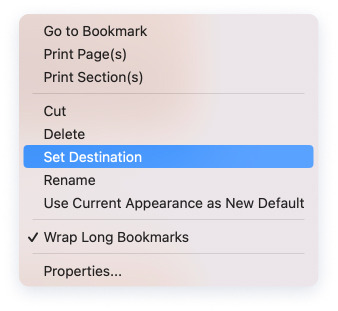
- Go to the page you want to set as a new destination for your bookmark.
- Right-click the bookmark you want to modify and select Set Destination.
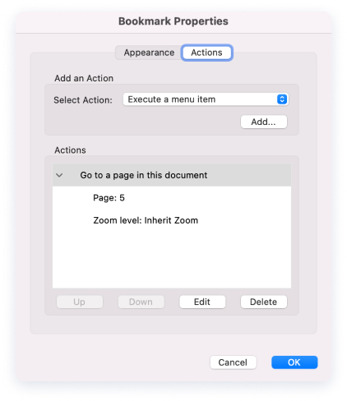
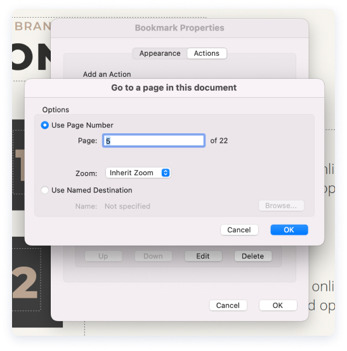
Alternatively, when right-clicking on the bookmark, you can go to Properties > Actions > Edit and type in the number of a new page there. This way, you won’t need to scroll to the needed page.
 |
 |
How to add nested bookmarks (sub-bookmarks) in Adobe Acrobat
Nested bookmarks are extremely useful when creating a long document with a complex structure such as a textbook or an industrial catalog. They provide your readers with easy and quick access to necessary information, making the document much more comfortable to work with.
To add a sub-bookmark to your PDF in Adobe Acrobat:
- Add a normal bookmark.
- Drag it to the ‘parent’ bookmark.
You’ll see a horizontal line marking the new level of nestedness.
To go back to a higher level:
- Create a new bookmark.
- Drag it to the last bookmark of the previous level.
#2 How to add bookmarks to your PDF in Microsoft Word
Adobe Acrobat is the easiest way to add bookmarks but it’s not the only one. If you don’t have access to this PDF editor, here’s how you can create a bookmark navigation for your document in Microsoft Word. You will need to work with a Word document that you will export as a PDF later.
First, you’ll need to apply heading styles to the relevant headings in your Word document to create a navigation structure.
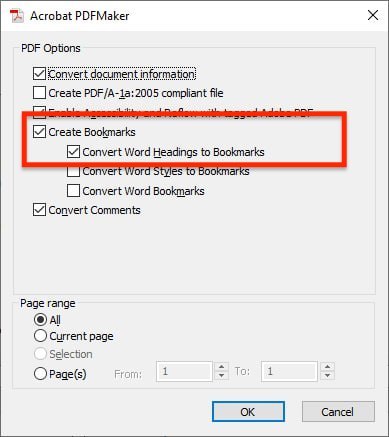
Once the structure is ready, go to File > Save as Adobe PDF. Then click on Options and select Convert Word Headings to Bookmarks. Done!
#3 How to add bookmarks to your PDF in Preview
If you are using MacOS, you can use the standard Preview app to create bookmarks in your PDF document.
- Open your PDF in Preview.
- Go to the page you want to bookmark.
- Go to Tools > Add bookmark.
- Then go to View > Bookmarks to open a sidebar of the same name on the left.
However, adding bookmarks in Preview has some drawbacks. Firstly, you cannot customize the bookmark names. Secondly, the bookmarks don’t get saved. So if you want to work with another PDF viewer later, you will need to re-create the bookmarks from scratch.
#4 Adding interactive navigation to your PDF with FlippingBook (Bookmark Alternative)
Some documents are more important than others. When you are sharing a sales presentation, a large catalog, or a guide, you want your readers to have the best experience with it—and find any information they need swiftly and easily.
FlippingBook is here to help. It’s a digital publishing platform that transforms your PDFs into interactive documents with enhanced navigation. Here, look at the options and some examples to see what your PDF documents can look like:
PDFs with an interactive table of contents
FlippingBook allows you to create a table of contents from scratch to streamline navigation across your content. Just upload your PDF to FlippingBook and make a table of contents right away with the help of the handy Table of Contents Editor.
PDFs with thumbnail navigation
For documents that are more on the visual side, such as lookbooks or albums, you may want to go with thumbnails instead of a table of contents. This way, your readers will instantly see page previews and jump to the relevant page by clicking on it.
PDFs with internal links
Make the table of contents in your PDF clickable by adding links to any pages of the document. With internal linking, the document will feel more like a website than a PDF, making it much more comfortable to work with the document. Check out inspirational ideas for a helpful table of contents design.
Australian Brandenburg Orchestra Brochure
PDFs with tabs
Documents divided into distinct sections will benefit from tabs. You can create tabs easily by incorporating them into your document design, and then adding links on top—it’s as easy as 123!
FlippingBook for Your Digital Documents
By the way, if you are looking for an easy way to design a PDF, you create one in Canva using one of our free templates and then send it straight to FlippingBook to add interactivity.
Ready to enhance your PDFs with interactive navigation tools?
Awesome! But that’s not the only perk FlippingBook brings to your docs. Discover sharing as a link, video embedding, multiple content protection options, and more.