How to change the menu bars?
Your FlippingBook publication has top and bottom menu bars by default. It is possible to add or remove menu bars. You can also choose which user interface elements appear in these bars. By configuring menu bars, you define the ways your readers can interact with your flipbook.
You can also set up a side window to show up when your publication is first opened. The side window can provide navigational aid or allow your readers to add personal notes.
Keep on reading if you would like to learn how to:
- Add and remove user interface elements
- Change the Bottom Menu
- Adjust the Top Bar
- Set up the Side Window to open automatically
Adding and removing user interface elements
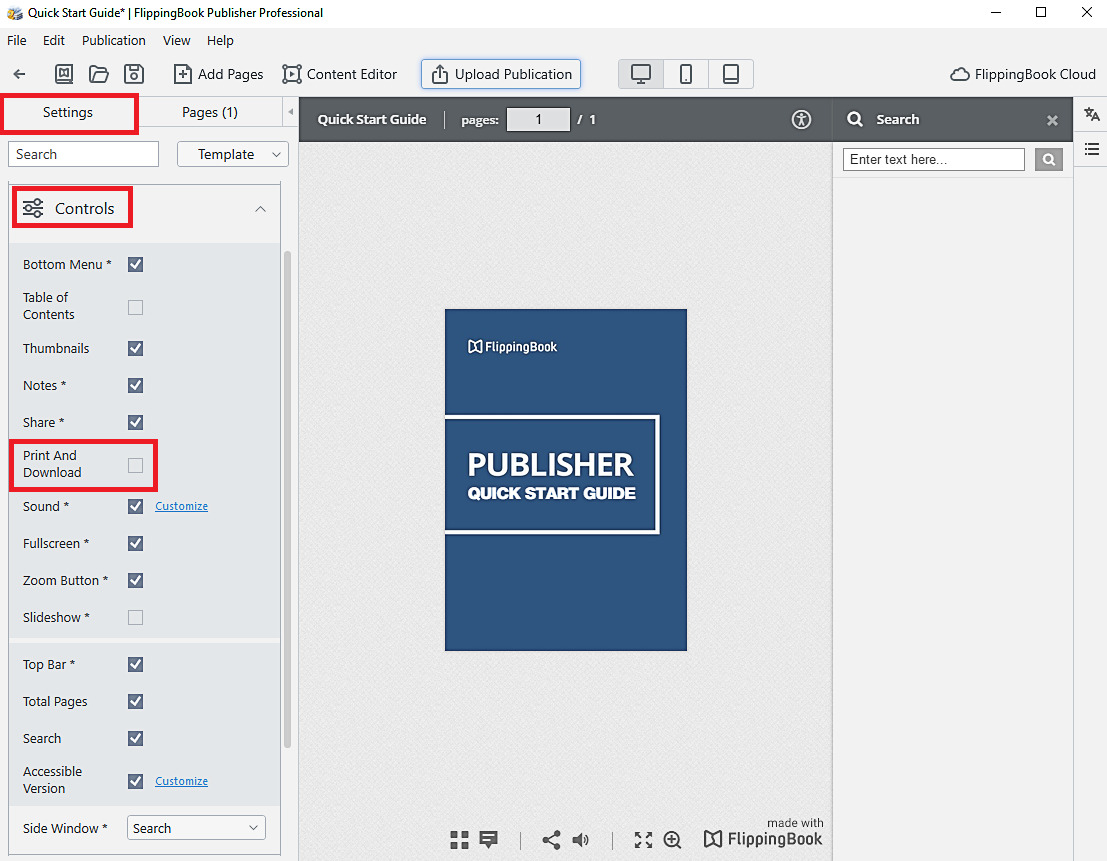
To change the menu bars, open the Settings tab and click on the Controls group to expand it. Most of the settings in the Controls group are represented by checkboxes. You can add or remove user interface elements by checking or unchecking the corresponding boxes.
In the example below, we have removed Print and Download options from the bottom menu:
Note! The settings marked with an asterisk (*) are not supported on phones and tablets. In the Controls group, these settings are Bottom Menu, Notes, Share, Sound, Fullscreen, Zoom Button, Slideshow, Top Bar, Side Window. When your flipbooks are viewed on phones and tablets, the publication interface is optimized for mobile devices. For more information, please refer to the article FlippingBook Publisher publications on mobile.
Changing the Bottom Menu
You can configure the bottom menu by changing the following settings in the Controls group:
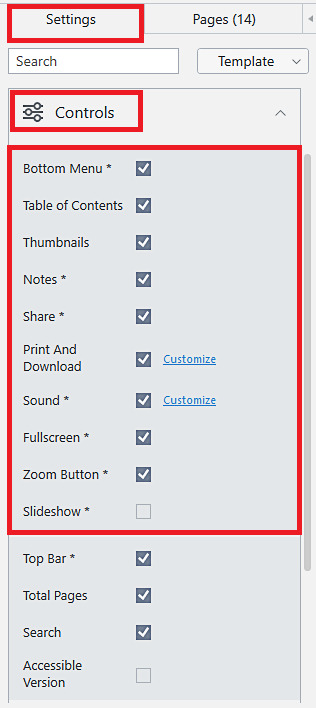
- Bottom Menu: use this setting to show or hide the bottom menu bar. Hiding menu bar can be useful if you intend to embed your flipbook in your site and you want to remove the interface completely to avoid clutter on your page. Please note that in this case, many functions will not be available.
- Table of Contents: use this setting to add or remove the table of contents button. This button opens or hides the side window showing the table of contents. Please note, the button can only be added if your publication actually has a table of contents. Learn how to create a table of contents.
- Thumbnails: add or remove the thumbnails button. This button opens or hides the side window showing miniature previews of your publication pages. This option gives your users a visual aid to navigate through your flipbook. However, if your publication contains mainly text, then this feature may not be very helpful, and you can choose to disable it.
- Notes: with this setting, you can allow your readers to add notes to publication. Notes can be used as bookmarks or comments.
- Share: show or hide the share button that allows sharing your flipbook on Social Media.
- Print and Download: add or remove print and download buttons. Your users can click on these buttons to print or download some or all the pages of your original PDF. Disabling this option protects your content from unwanted offline distribution. Note that downloading and printing are grouped together because either option gives your readers an opportunity to use both functions. If you allow downloading, then users can print the downloaded version. If you allow printing, then users can print to a ‘PDF-printer’ to acquire a PDF copy of your document.
- Sound: enable or disable the sound button for your publications. This setting also gives you an opportunity to change your publication background sound. To set background sound, choose the option Sound and click on Customize. To hear the background sound, you need to publish your document.
- Fullscreen: toggles the fullscreen button that allows your readers to switch to full-screen mode. In full-screen mode, the browser interface is not visible, and your publication occupies the whole screen.
- Zoom button: use this setting to add or remove the zoom button. The zoom button allows your readers to get a close-up view of your content. Disabling this option removes the zoom button and prevents your users from zooming in.
- Slideshow: use this setting to add or remove the slideshow button. Users can press this button to start or stop slideshow. In slideshow mode, the pages of your book turn automatically. You can configure the slideshow mode by clicking on the Customize link. Here are the settings you can change:
1. Autostart - enable/disable autostart of a slideshow when your publication is opened.
2. Loop Slideshow - set up the slideshow to loop continuously.
3. Time Interval for Page (seconds) - allows you to change the time interval between two slides.
Adjusting the Top Bar
You can configure the top bar using the following settings in the Controls group: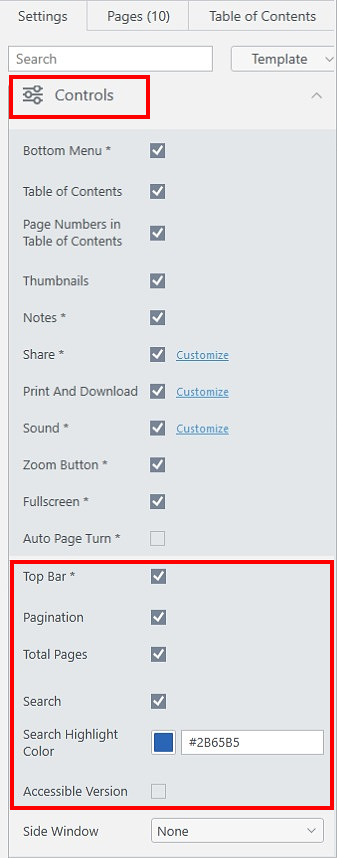
- Top Bar: use this setting to show or hide the top menu bar.
- Pagination: use this setting to show or hide the field showing the current page(s) and the total number of pages as a whole.
- Total pages: use this setting to show or hide the indicator of the total number of pages in a flipbook.
- Search: toggles the search component in the top right corner of your publication represented by a magnifying glass. Users can click on the magnifying glass, type search text, and press the enter key. The search results appear in the side window.
- Search Highlight Color: use this setting to set a custom highlight color for search results. Users can click the color box next to the setting to pick a color that fits your brand’s look and feel. Once done, click OK to accept the changes.
- Accessible version: use this setting to add an accessible PDF. Learn more about Accessibility in FlippingBook publications.
You can also add the Contacts Button to the top bar. This button is most commonly used to provide a link to contact information, but you can actually use this button however you like! So, you can change the button text and provide a link to, for example, an order form, your privacy policy, or anything else. To add that kind of button to your publication, you will need to expand the General group on the Settings tab and check the Contacts Button box.
Note! The Contacts Button setting is not supported on phones and tablets.
Changing the Side Window
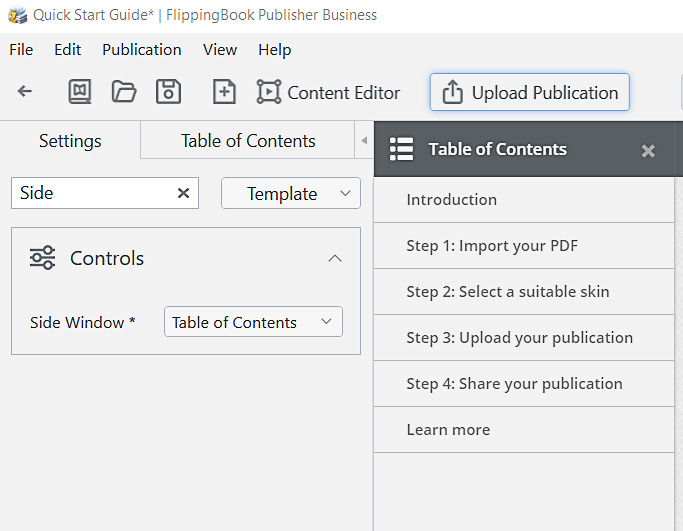
The Side Window option allows you to set up any of the four available side windows (Table of Contents, Search, Thumbnails, or Notes) to appear automatically when your visitors open your publication.
Here is how you can configure the side window:
- Open the Settings tab and click on the Controls group to expand it (alternatively, you can start typing “Side Window” in the search field on the Settings tab to find the setting).
- Choose one of the available options (None, Table of Contents, Search, Thumbnails, or Notes) for the Side Window setting. If you choose the None option, the side window will be closed when your readers first open the publication.
Depending on your content, you can choose the most suitable side window to be shown by default:
- If your flipbook has hundreds of pages, then a table of contents is a necessity to help your users navigate around. And this is a good reason to show a Table of Contents by default.
- If your publication is a catalog and you expect your readers to search for item numbers, then selecting the Search option would make sense.
- If your publication content is mainly visual, then showing Thumbnails by default would be most helpful for your readers.
- If you would like to encourage your readers to use notes, you can show the Notes by default.