How to add a Table of Contents to my flipbook?
A Table of Contents (ToC) helps your audience to navigate your flipbook quickly and easily. Your readers click on the headings in the ToC, and the flipbook opens on the target page immediately. This makes it a breeze to find the content they need!
If your flipbook has a ToC, the readers can make it appear by clicking the Table of Contents button in the bottom menu. The ToC will show up next to your flipbook. You can also pin the ToC in advance, so it will be shown right away when someone opens your flipbook.
If your content has a complex structure with many sections and sub-sections, you can add subheadings to your ToC. These are hidden by default and appear if your reader clicks on the small triangle before the heading. Subheadings also unfold when the reader clicks on the heading itself.
- Where can I find the ToC editor?
- How to create a ToC from scratch?
- How do I edit my current ToC?
- How to show the ToC right after my readers open the flipbook?
- How can I hide the page numbers in my ToC?
Where can I find the ToC editor?
You can make additions and changes to your Table of Contents in the ToC editor. To open it:
- Open the list of your flipbooks.
- Hover over the flipbook you want to change and click the Customize button:

- Select the Table of Contents from the list of options.

This opens the ToC Editor. On the left-hand side of your screen, you can make changes to your ToC. In the screenshot below, we have outlined this part in red. On the right-hand side, you will see a preview of your flipbook with the current ToC.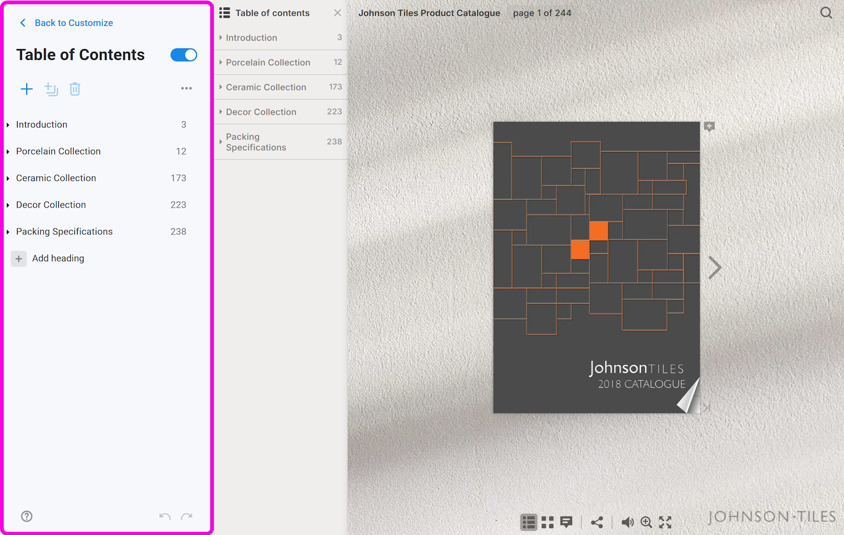
If your PDF has bookmarks, there's no need to start from scratch. We will automatically create a ToC for your flipbook based on these bookmarks as in the example above. Doesn't your PDF have any bookmarks? Then you can create a Table of Contents as described below.
How to create a ToC from scratch?
No ToC yet? This is the easiest way to create one!
- In the live preview area on the right-hand side, flip to the page for which you want to create the first heading in your ToC.
- Click on the
 Add heading in the Table of Contents area. Type the name of your heading as you want it to appear to your readers, (or copy it from the page in your flipbook in the preview area!) and press Enter.
 - The cursor now jumps to the page number. It is set to the number of the left-hand page by default. Change it to the number of the right-hand page if required.
- Browse forward through your book until you find the next page for which you want to create a heading and repeat the steps above.
- If you want to create a subheading, click the Add subheading icon
 . This way, you can create second-level entries. To create a third-level entry, create a subheading within a subheading.
 - Keep adding headings and subheadings until your ToC is done and press OK to close the ToC editor. Then press Finish to close the Customizer and save your changes.
It will be a rare day that you finish your whole ToC without needing any corrections. Did you make a mistake somewhere? Read on to see how you can edit your ToC.
How do I edit my current ToC?
If you want to edit an existing table of contents, then there are lots of possibilities:
- to add a new heading, press the + button. If you have no (sub)heading selected, we add a new header at the bottom. If you select a (sub)heading and then use the + button, we add a new heading below the selected header and at the same level.
- to rename a (sub)heading, double-click on the name and type the new name;
- to change a page number, double-click it and update it to the desired number;
- to move the heading up or down, click on it and keep the mouse button pressed down. Then drag it up or down to the desired spot and release the mouse button to drop it;
- to turn a heading into a subheading, click on it, drag it to the right, and release the mouse;
- to turn a subheading into a top-level heading, click on it, drag it to the left, and release the mouse;
- to delete a heading, and all of its subheadings (!!!) select it and press the trashcan icon or the Delete key;
- to delete all headings, click on the 3 dots at the top of the Table of Contents area (to the right of the Trashcan), and choose Remove all headings;
- to disable the Toc without deleting the headings, turn off the slider at the top of the Table of Contents area.
Pro Tip💡You can always cancel your previous steps by clicking the Undo icon (the arrow curled backward) at the bottom of the ToC area.
You can also right-click on any heading or click on the 3 dots behind it to bring up the context menu with some common tasks: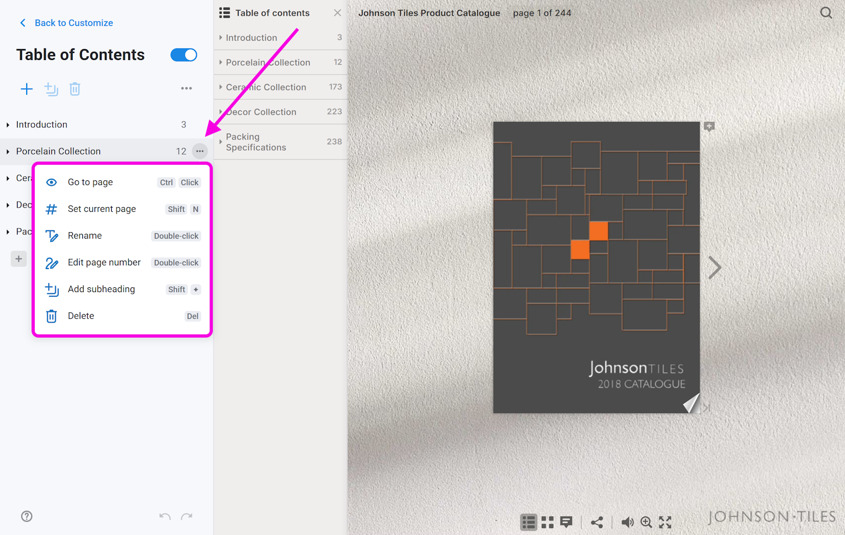
In this menu you can choose the following options:
- Go to page - opens the page of this (sub)heading. You can use this option to quickly see if your heading leads to the correct page.
- Set current page - sets the page number of the (sub)heading to the current page.
- Rename - allows you to type the name for the (sub)heading.
- Edit page number - allows you to edit the page number for the (sub)heading.
- Add subheading - adds a subheading for the current (sub)heading.
- Delete - deletes the current (sub)heading including all subheadings inside it.
Pro Tip💡As you may have noted, we support keyboard shortcuts for the most common tasks. You can click on the ? icon in the bottom left corner to see more shortcuts. If you find yourself generating long ToCs regularly, you can save a lot of time by learning them.
How to show the ToC right after readers open the flipbook?
For large flipbooks, we recommend pinning the ToC. This way, it 'shows up immediately when someone opens your flipbook. Your reader won't need to click the ToC icon. Or worse, they may not notice that icon at all! To pin the ToC:
- Go to the list of your flipbooks.
- Hover over the flipbook you want to change and click on the Customize button.
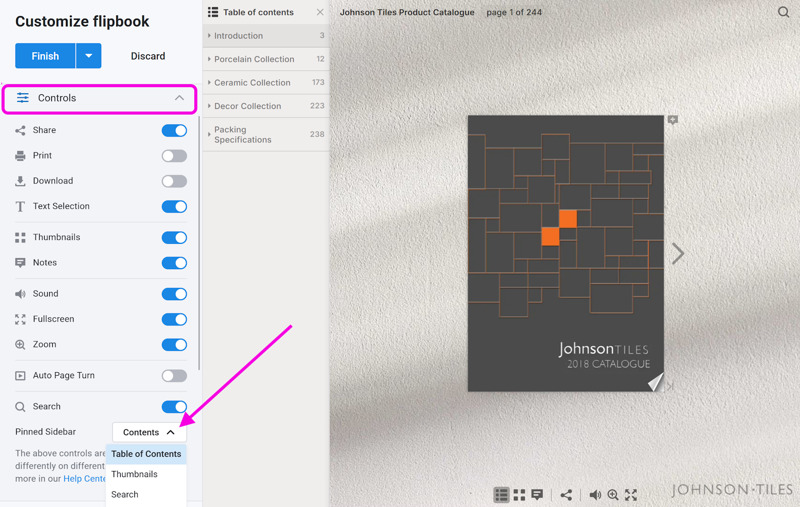
- Expand the Controls section, find the Pinned Sidebar setting, and select the Table of Contents from the list of options.
- Press Finish in the top left corner to save your changes.
Now, whenever someone opens your flipbook, the ToC will show up right away.
How can I hide the page numbers in my ToC?
If you want to hide the page numbers in your ToC to give more room to the text, you can do it in the ToC window:
- Open the list of your flipbooks.
- Hover over the flipbook you want to change and click the Customize button.
- Select the Table of Contents from the list of options.
- Click on the 3 dots located at the top of the Table of Contents window and choose the Show/Hide page numbers option:
As you can see, the page numbers are removed in the preview area where we show what your audience will see. - Choose Back to Customize and click Finish to save the changes.
Learn more
- Looking to change the color of the ToC panels? Learn how to choose your own colors for your flipbook background and user interface elements.
- Do you want to customize not only a ToC but the entire flipbook? Read more in the What customization options are available? article.