Working together on flipbooks with teams
Where private folders are intended to organize your flipbooks neatly, shared folders open a whole new possibility: collaborate on publications with your team members! Obviously, this requires a multi-user plan so you can work with multiple users in the first place. The key principles:
- Flipbooks in your Private folders (including your Home folder) can only be changed by you.
- Flipbooks in Shared folders can be changed by all members of your team.
- All flipbooks, both in Private folders and in Shared folders, will be visible to your readers all the time. It doesn’t matter which folder they are located in. The link will never change if you move them around.
In this article, we describe how to get started with shared folders.
- Creating shared folders
- Turning private folders into shared folders
- When to use private and shared folders
- Finding out who modified a flipbook
For more advanced settings and implications of shared folders, please visit our article about shared folders in-depth
Creating shared folders
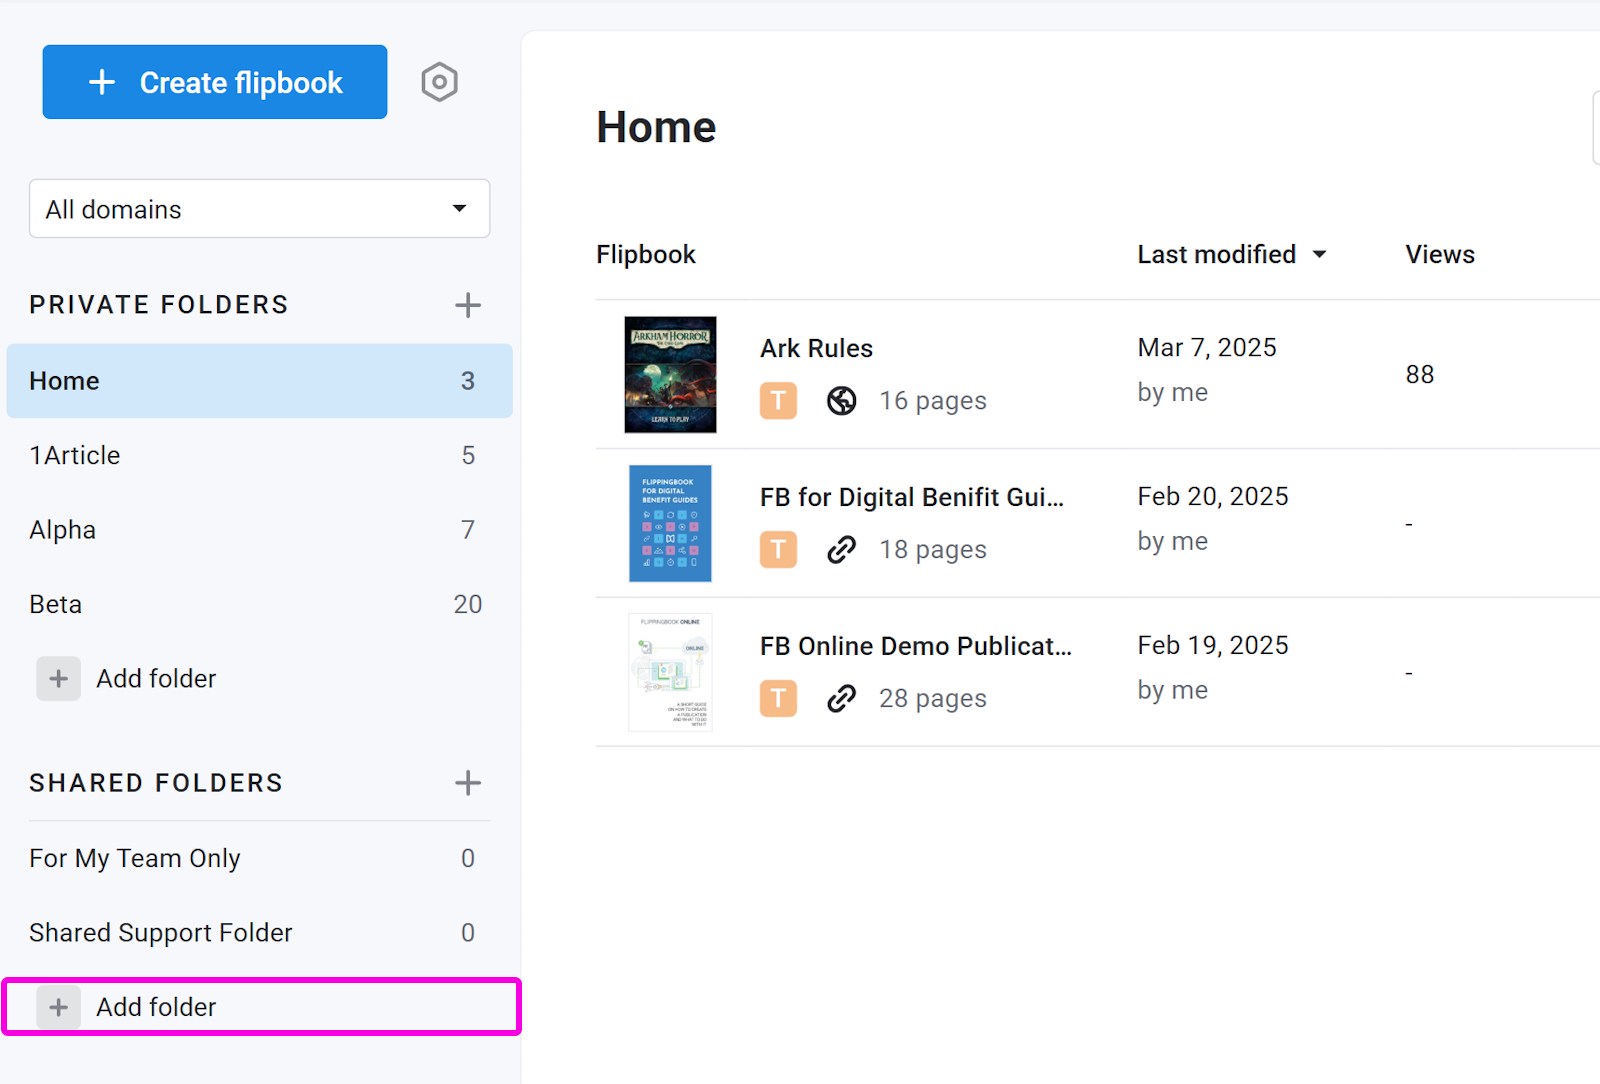
To start collaborating, you (or any of your team members) can create a new shared folder. This is done by simply clicking on the + behind Shared Folders or on the Add folder field under Shared folders.

Give the folder a suitable name, and all flipbooks that you now add to this folder will be editable by all the members of your team! If you already have a couple of flipbooks, you can simply move them to the shared folder.
Turning private folders into shared folders
It is possible to turn an existing private folder into a shared folder. All the flipbooks in the folder will also become editable by all your team members. To turn a private folder into a shared folder:
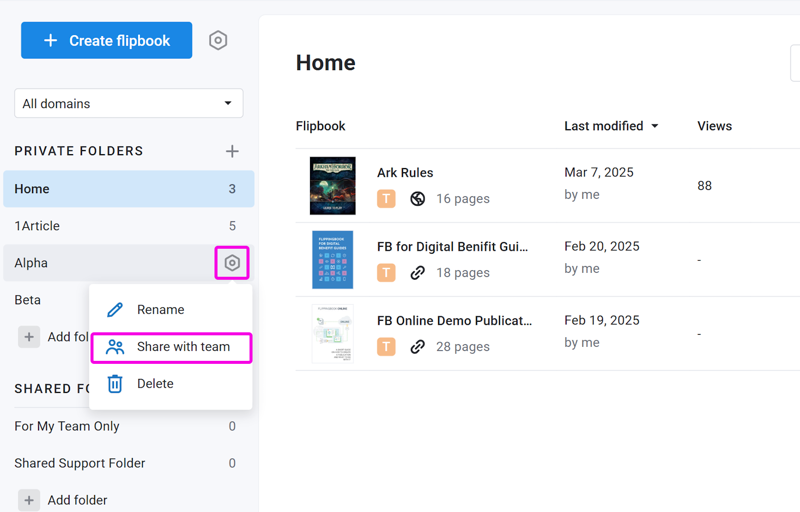
- Hover over the number behind the folder (the number shows how many flipbooks are in the folder).
- The number will turn into a small cogwheel. Click on it and from the dropdown menu, select Share with team.

- You will now see a pop-up window where you can confirm this change.
Note: Changing a shared folder back to a private folder isn’t possible. If you really want to turn a shared folder into a private one, you can always create a new private folder, move all the flipbooks from the shared folder to your new private folder, and then delete the shared folder.
When to use private and when to use shared folders
When you use shared folders, then all the users in your team have full control over all the shared folders and all the flipbooks in them! It is truly a shared workspace. This means that everyone can update the flipbooks (customizing them, add and remove videos and links, replace the PDF), delete the flipbooks, move them to other folders, or delete entire folders. It's comparable to working together on a shared network drive. Most of the time, this is exactly what you want. But if you really don’t want your colleagues to touch some of your flipbooks, then keep them in a private folder instead. It’s what they’re for, after all.
Shared folders make it possible to work on a shared set of publications. Even so, we recommend you not to work on the same publication at the same time with your colleagues! This can lead to unexpected results! For example, take a look at the following scenario:
- We have a flipbook in a shared folder with a gray background, which we want to change. Both John and Francis start working on that.
- John opens the flipbook (gray background) and goes to Manage > Customize.
- At the same time, Francis also opens the flipbook (which still has a gray background) and also goes to Manage > Customize.
- John now changes the background to a red one and presses Finish. All looks fine.
- Francis changes the background to a purple one and presses Finish. For her, it looks fine too. But that overwrites John's changes, which Francis wasn't even aware of!
The scenario above is pretty straightforward and probably easily rectified. But if you plan to make extensive changes, then it may be a good idea to temporarily move the flipbook from a shared folder to one of your private folders. This prevents your colleagues from accidentally overwriting your changes. When you're done, simply move it back to the shared folder. (Remember: the flipbook will stay visible to your readers at all times and the link won't change).
Finding out who modified a flipbook
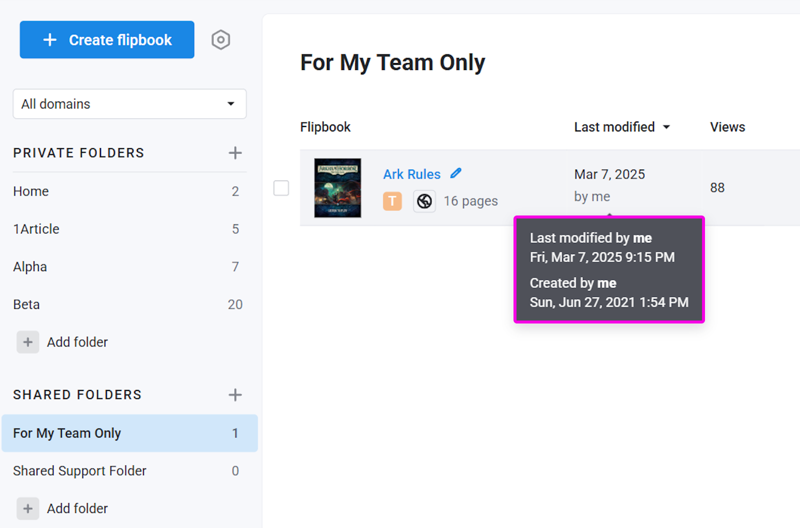
You can always see who made the latest update to a shared flipbook and when it was made. This information is shown in the Last Modified column. If you hover over an entry, you will see the exact time of the modification and also when it was originally created, and by whom.

Note that it has to be a real change (e.g. the name or background, a change in the editor, or replacing the PDF). Simply moving the flipbook from one folder to another doesn't count as a change.
Full logs of what was changed exactly are not available, but this at least will give you a starting point so that you can ask your colleague what they changed.
Learn more
This should be enough to get you started on collaborating with your colleagues! To learn more about the finer points of working with shared folders, and how they interact with other functionality, please read our article shared folders in-depth.
Note! If you have any questions, or you’d like to see how it works before upgrading, feel free to book a meeting with one of our specialists.