Uploading publications to your servers
FlippingBook Publisher enables hosting flipbooks on your own server. In this article, we explain the pros and cons of self-hosting compared to hosting on our cloud. You will learn how to generate files for a flipbook and upload them to a server.
Note!This article is rather lengthy. Uploading to a server is not rocket science, but it is also not a question of pressing two buttons and you’re done. If something is not clear to you or you feel overloaded, feel free to contact our support team. Also, we recommend consulting with your website administrator or with your IT staff before you decide to host flipbooks on a server
- The pros and cons of hosting on your server
- Technical requirements
- How to transfer publications to your server?
- Understanding (S)FTP
- Generating the files to upload
- How to upload a flipbook with an FTP program?
- Uploading the publication directly from FlippingBook Publisher
The pros and cons of hosting on your server
Publisher provides two options for hosting flipbooks: on your server or on FlippingBook Cloud. In the table below we shortly describe the pros and cons of hosting on a server compared to using FlippingBook Cloud.
| Hosting on your server | |
| Pros | Cons |
|
You do not pay for our cloud. Store as many flipbooks as your server space allows |
You need to allocate enough space on a server. Large publications can take up more than 1GB |
| You can customize all parts of your links, for example, by including your company domain name |
You need some technical knowledge and extra authorization to set up a server and upload flipbooks |
| Store flipbooks on your server if your company prohibits using cloud services like Amazon Web Services (this is what FlippingBook Cloud uses) |
Uploading and updating flipbooks takes significantly more time and effort |
|
You cannot use cloud-related features like the library, bookshelf, or teamwork to collaborate on a flipbook |
|
| Flipbooks on a server do not update automatically when we introduce new features or apply bug fixes. You need to update them manually | |
Self-hosting will be the only option if your company policy does not allow using cloud-based services at all. If this is no issue, then we advise you to consider how much time you are willing to spend on uploading and updating flipbooks. Our experiences are that for some expert users, this is almost as easy as uploading to our cloud. But we also see that many of our clients spend hours per week and later switch to cloud hosting anyway.
Technical requirements
Flipbooks will work well on all major web servers (such as NGINX, Apache, and IIS). There are no special requirements. The most common problems that we encounter are related to configuration settings. We advise you to check if your server
- has the correct MIME-type set up for SVG and WEBP files;
- serves index.html as a default page;
- allows HEAD requests in addition to GET requests.
How to transfer publications to your server?
We advise you to consult with your IT staff or web server administrator on the best way to upload a flipbook to the server. Usually, it occurs in 3 ways:
- Only the server administrator has the right to upload anything. You generate the files for the flipbooks in Publisher and send them to the administrator who uploads them.
- The administrator sets up a specific folder on your network. You generate the files for a flipbook in Publisher in that folder. The files get transferred to the server automatically.
- The administrator allows you to upload the files to a server yourself and provides you with an account on the server. You make your flipbook in Publisher and upload it from Publisher using its built-in FTP program or a third-party FTP client. In this case, we advise you to read the next section first to get a basic understanding of working with FTP.
Understanding (S)FTP
When you transfer files on your own computer, you simply copy and paste them. To move files to another computer or a network drive on the same network, you can also copy and paste them as usual. But your webserver is almost never on the same network as your computer. And this complicates things. To copy files to a computer on another network, you need to send them using the File Transfer Protocol - FTP. This requires special software.
The FTP software sets up a connection between your computer and the web server. Then you can start transferring files. But FTP was designed to transfer single big files. It works rather slowly if there are a lot of files to transfer like with flipbooks. Moreover, if you make a mistake, you may need to reupload the files. For example, you uploaded the files to the wrong directory. Often you cannot simply drag the folder to the right place. You will need to upload everything to the right folder starting the whole process again. This makes FTP a rather unforgiving solution if you make small mistakes.
Since you transfer data from your computer to a server that is outside your local network, your network administrator may have to grant you special permission to do so. Also, they may need to configure the firewall to make the transfer possible.
The difference between FTP and SFTP
FTP and SFTP (a.k.a. Secure FTP) are very similar in what they do. The difference is that if you use FTP, the communication between your PC and the web server is not encrypted. When you communicate with the server, the data you send and receive may pass through several other servers. Those servers may be completely unrelated to your company. And all these servers can theoretically read your data.
If you use SFTP, your PC and the server first discuss a way to encrypt all further communication. This means that the servers in the middle have no way to read the contents of your communication. This makes communication is secured.
Generating the files for upload
Generating a zip file for your administrator to upload
To generate flipbook files for a web server, please follow these steps:
- Click Upload Publication
- Choose the Local folder option.
- Use the ... button to select the folder to which you would like to save your publication.
- We advise you to enter the URL for sharing and embedding.
- Press Start. This generates all the files for your publication and saves them on your local computer
- Once done, you can go to this folder by clicking View Folder. You can also use the Preview button to preview the result. Note that at this point, your content has NOT been uploaded to the internet yet. The URL that starts with 'localhost' will only work for you, not for anyone else! The video below shows these three steps
- If your administrator uploads files for you, send them in a .zip package.
- Press the View Folder button.
- Select all the files and folders by pressing Ctrl+A.
- Right-click and choose Send to > Compressed (zipped) folder. This will generate a .zip file in your current folder that you can send to your webmaster to upload
Generating the files in a specific folder
If your IT staff has set up a folder for you on the local network then follow these steps. First, set up your default folder. You only need to do this once.
- In the menu bar, go to Edit > Preferences.
- Go to the Upload tab.
- In the Select Folder field use the ... button to select the folder that has been set up for you.
- Press OK.
You have now set up the base folder for your output. To create new flipbooks in this folder:
- Click Upload Publication
- Choose the Local folder option. We will now select your default folder and generate a subfolder in it with the Publication name. You can change the name manually if you prefer.
- We advise you to enter the URL for sharing and embedding.
- Press Start.
How to upload a flipbook with an FTP program?
If you decide to upload to your own server with an FTP program, you will need specific knowledge about the server to upload a flipbook to the correct place and find the flipbook's URL. We recommend doing this only option if you are comfortable working with an FTP program. If you upload the files to the wrong place, you may even overwrite other pages.
First, generate the files for your flipbook in a local folder.
- Click Upload Publication.
- Choose the Local folder option. Use the ... button to select the folder to which you would like to save your publication.
- Press Start. This generates all the files for your publication and saves them on your local computer
- Once done, you can open this folder by clicking View Folder. Now you will need to upload these files.
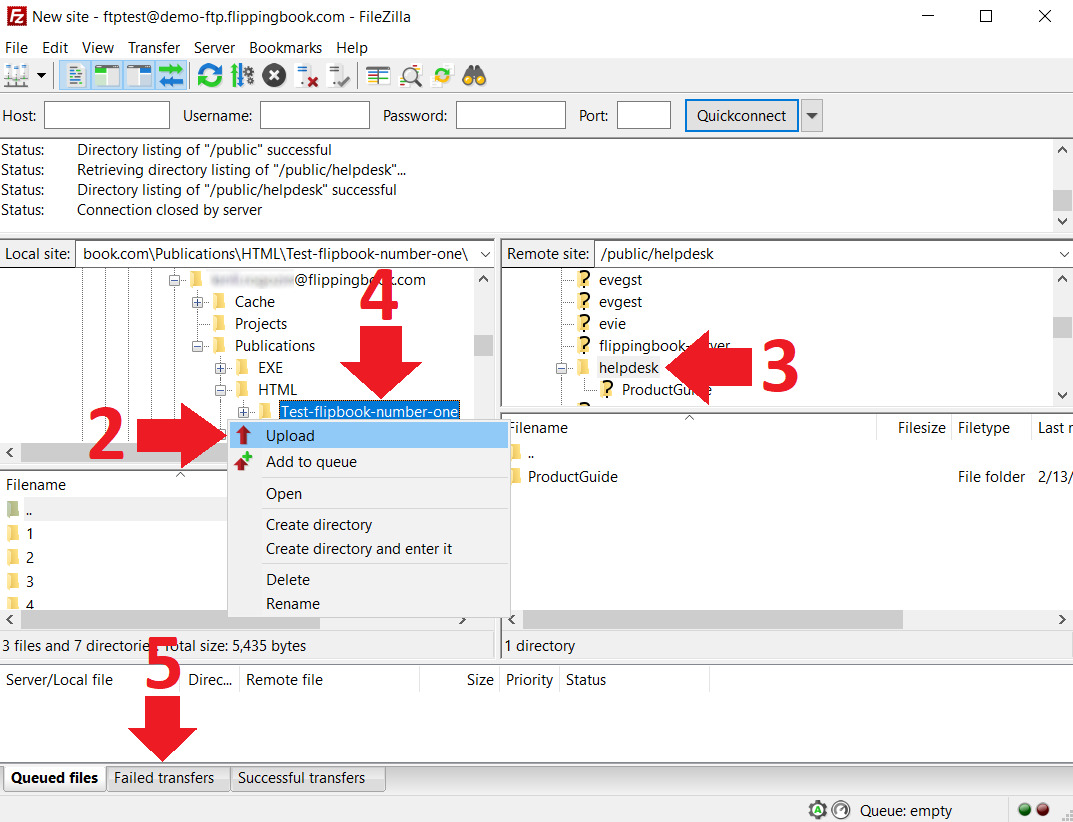
In this example, we will use FileZilla to upload the generated files to our server. FileZilla is a high-quality free FTP client, but you can use any other FTP program. Follow these steps:
- Log in to your server with your FTP credentials by specifying the Host, Username, Password, and Port. Then press Quickconnect. This information is provided by the server administrator or your hosting provider.
- Once connected, the left-hand pane shows folders on your PC. Navigate to the folder to which you published your flipbook files earlier. Here we use Test-flipbook-number-one
- The right-hand pane shows folders on your server. Click on the folder where you want to host your flipbook. Here we use /public/helpdesk
- Right-click the folder with the files on your PC in the left pane. Select the Upload option
- Wait for the upload to complete. Depending on the size of your publication, this may take a while. Check the Failed transfers tab at the bottom. If the field is empty, it means that all files uploaded fine. If it shows failed transfers, you will need to remove the files on the server and re-upload the files. Even one failed transfer may cause a flipbook to stop working.
How to find out the flipbook’s URL?
After the upload, your flipbook is on your server. To open, share, or embed it we need to know its URL (link). The URL depends on server settings. In our example, to find the URL we:
- Navigated to the folder on the server in the right pane
- Found the index.html file in that folder
- Right-clicked on the file and selected Copy URL(s) to clipboard

-
Got the following URL:
ftp://ftptest@demo-ftp.flippingbook.com/public/helpdesk/Test-flipbook-number-one/index.html
-
Changed the ftp protocol to http or https at the beginning of the URL and to this URL
https://demo-ftp.flippingbook.com/public/helpdesk/Test-flipbook-number-one/index.htm
In our example, finding out the URL to open the flipbook was simple. In reality, it may not be that simple. The FTP protocol uses settings and names, different from those the HTTP protocol uses. And we need to use HTTP to open a flipbook in a browser. Here is an example where the URL is different from the one we expected. You upload to ftp.example.com, to the folder docs/catalogs/2021. We assume that https://ftp.example.com/docs/catalogs/2021/index.html will work. But the actual link to open the flipbook in a browser may be https://www.example.com/catalogs/2021/index.html. Here ftp becomes www and docs are dropped. So only your server administrator knows the exact details.
Note!We recommend creating a new folder for every upload. This prevents problems with caching, where files from a previous version are mixed with files from the latest version. This may cause problems when opening your publication.
Uploading the publication directly from FlippingBook Publisher
If you are comfortable with FTP/SFTP, you can use the built-in FTP client in Publisher to generate and upload files. To learn more about the specifics of SFTP, please have a look at our article Uploading publications to your server via SFTP. Here we show how to upload files via FTP:
- Open your flipbook in Publisher, press the Upload button, and choose FTP/SFTP server.
- Enter your server’s name (host), login, and password in the corresponding fields.
- In Protocol select FTP and press Next. Publisher will connect to your server.
- Select the folder where you will store the publication. Right-click on it and choose Add subfolder
- Type a name for the subfolder and press Enter. Press Next.
Caution!Uploading to a folder that already contains files or subfolders removes these files and subfolders! Make sure to create a new folder or a subfolder for every upload. Or make sure to select the correct folder. It will prevent deleting or overwriting existing folders and files in the folder and save you from caching problems later
- Add a URL for sharing and embedding in the corresponding field. Apply suitable Access settings and press Start. This will generate the files and upload them to your server.